
Latest update
What’s new in v0.8.4
- The bundled Kaizen Overlay releases graphics resources when a layer is hidden or removed and keeps image watermarks at a bounded size.
- The plug-in footer now reports the renderer actually in use: Metal, OpenGL fallback or offline.
- AAX, VST3 and AU are Universal for Apple Silicon and Intel and require macOS 12 or later.
Streamers Pro — User Manual
Manual version v0.8.4 · September 2026 · Kaizen Audio
Contents
- Introduction
- System requirements
- Installation
- Licensing: trial, activation and deactivation
- Quick start
- Streamers, punches and the sync point
- The interface, zone by zone
- The overlay on top of your video
- Kaizen Overlay and the Accessibility permission
- The 8 boxes: anatomy of a cue
- Triggering with MIDI
- Triggering with Pro Tools markers
- The marker text on screen (caption)
- Beeps: the 3-2-1 countdown
- Cue Strip, Scene and the transport icon
- Sync: Auto PDC and Sync Offset (Mac)
- Presets: what travels with the session and what doesn’t
- DAW notes and known limitations
- Troubleshooting
- Specifications
- Appendix: every Overlay Settings control
1. Introduction
Streamers Pro draws sample-accurate streamers and punches right over your DAW’s video window. It is built for ADR, dubbing, foley and scoring to picture: the actor (or the musician) watches the line sweep across the screen and comes in exactly on the punch — the way cueing has worked in dubbing stages forever, but with no scratched film, no outboard hardware, and without leaving Pro Tools.
The plugin creates a transparent window that positions itself over the DAW’s video and lets every click pass through (you keep working in Pro Tools as if it weren’t there). On that window it draws:
- Streamers — the vertical line that sweeps the picture and announces the entrance.
- Punches — the flash that marks the exact moment (the GO).
- 3-2-1-REC countdowns — four synchronized flashes, with optional beeps.
- The marker text as a subtitle (the line the actor has to deliver).
- The Cue Strip: a tape-machine-style strip with the picture cuts sliding under a fixed playhead, plus an optional second Scene strip.
Cues are triggered two ways, and you can mix them:
- Pro Tools markers (recommended): drop memory locations in your session and the plugin reads them by itself. The marker defines the sync point; no MIDI, no clips, nothing to export.
- MIDI notes: the classic MIDI streamer workflow. Each note fires one of the 8 boxes.
The core design idea: the trigger only supplies the “when”; everything else — color, duration, thickness, type — comes from the box (the cue’s template). Changing the length of your streamers never means moving a single marker or note: adjust it in the plugin and you’re done.
What goes in, what comes out
- Input: MIDI (to fire cues). The plugin does not process any track’s audio.
- Audio output: stereo — only the optional countdown beeps. Everything else it “outputs” is visual, on the overlay.
- Formats: AAX (Pro Tools), VST3, AU (Logic) — macOS only for now. It is a virtual instrument: it goes in the instrument slot of an instrument track.
2. System requirements
| Operating system | macOS 12 (Monterey) or later |
| Processor | Apple Silicon or Intel (native universal binary) |
| Formats | AAX · VST3 · AU (AUv2) |
| Pro Tools | 12.8.4 or later to load the plugin; 2025.06 or later for the full session integration (markers, Cue Strip, Auto PDC) |
| Sample rates | Any host rate — the plugin does not process program audio |
| macOS permissions | Accessibility, granted to the Kaizen Overlay app that ships with the installer (to follow the video window automatically — see section 9). It does not use Screen Recording, microphone or camera |
| iLok | Not needed. Streamers Pro activates with your Kaizen Audio account; no iLok account, no iLok License Manager, no USB dongle |
| Internet | Required to activate the license (offline activation is available using a second, internet-connected computer; see 4.4) |
Windows is in development; this version is macOS-only.
3. Installation
3.1 Install
- Download the Streamers Pro installer from your Kaizen Audio account.
- Double-click the
.pkg. The installer is signed and notarized by Apple: you will see no macOS security warnings. - Follow the steps: Introduction → Read Me (release notes) → License (usage agreement) → Installation Type.
- On “Installation Type” you can untick any format you don’t need. By default all three are installed:
| Format | Installs to |
|---|---|
| Pro Tools AAX | /Library/Application Support/Avid/Audio/Plug-Ins/Kaizen Audio/Streamers Pro.aaxplugin |
| VST3 | /Library/Audio/Plug-Ins/VST3/Kaizen Audio/Streamers Pro.vst3 |
| Audio Unit | /Library/Audio/Plug-Ins/Components/Streamers Pro.component |
Kaizen Overlay is also installed, without appearing in that list, into /Library/Application Support/Kaizen Audio/: it is the application that draws the overlay, it is shared by every Kaizen Audio plug-in, and it is not optional (section 9). If you already have the same version or a newer one — because another of our plug-ins installed it — the installer leaves it alone.
- Enter your administrator password when macOS asks for it and finish the installation.
3.2 After installing
- Restart your DAW so it picks up the plugin.
- Pro Tools: if it was open, quit it completely (Cmd+Q) and relaunch — it rescans plugins automatically. Streamers Pro shows up as an instrument (Instrument category), not as an effect.
- Logic: on first launch, macOS validates the Audio Unit automatically. Streamers Pro appears in the instrument selector of a software instrument track, under Kaizen Audio.
3.3 Updating
Install the new .pkg on top; no need to uninstall first. Your license, your presets and your settings are untouched. The plugin itself tells you when a new version is out: an Update Available card appears with an Update Now button (it takes you to the download in your browser; nothing installs itself). Do not show again silences it for that version only.
3.4 Uninstalling
There is no uninstaller; it is done by hand. Delete the three bundles from the table above (the first two require an administrator password). Do not delete /Library/Application Support/Kaizen Audio/Kaizen Overlay.app if you use any other Kaizen Audio plug-in that draws over picture — it is shared.
If you have other Kaizen Audio plugins installed, don’t delete the
Kaizen Audio/folders themselves — only the Streamers Pro bundles. And remember: before retiring or wiping a computer, free its activation with Deactivate (4.5).
Your user presets (if you want to keep them — or remove them too) live in ~/Documents/Kaizen Audio/Streamers Pro Presets/ — see section 17.
4. Licensing: trial, activation and deactivation
Streamers Pro is licensed through your Kaizen Audio account. No iLok, no serial numbers to type: activation happens in your browser.
4.1 What happens the first time
When you insert Streamers Pro without a license, the activation panel opens on its own over the plugin and cannot be closed until you activate. While it is not activated, the plugin is genuinely switched off: the overlay doesn’t appear, no cue fires (not TEST, not MIDI, not markers) and the beeps stay silent. The bottom bar says it plainly, in amber: License required — click LICENSE →.
There is no demo mode with watermarks or dropouts: without a license there are no streamers; with a license (or an active trial) you get everything, in full.
4.2 Activating (with internet)
- Click Activate your plugin, then Let’s go!.
- Your browser opens at kaizen.audio. Log in and, from the side menu of your user account, assign your license — or request the trial period if you haven’t purchased yet.
- Go back to your DAW. The panel closes by itself and, if
Overlayis on, the overlay appears within a couple of seconds — no restarts needed.
If the browser doesn’t confirm within 4-5 minutes, the panel shows Timed out, please try again! — just repeat the process.
One detail designed for the studio: once unlocked, the plugin will not re-lock mid-session — whatever happens to your network. Any license change on the server side takes effect the next time the plugin loads, never while a session is open and the actor is at the mic.
4.3 The trial period
The trial is the full plugin, with no limitations, for 7 days. While it runs, the license window shows Trial valid until with the exact date. When it expires, the plugin returns to the locked state (no overlay) and the activation panel reappears so you can enter a permanent license.
4.4 Offline activation (computer without internet)
If the studio machine is isolated from the network, on the Activation screen click the Offline Activation link:
- Step 1 — machine file: save your computer’s identifier file (
streamers-pro_OfflineActivation.dt, Desktop by default). - Step 2: take that file (USB stick) to any computer with internet and open the link shown in the panel (www.kaizen.audio/): it takes you straight to product activation on the Kaizen website. Upload the file and download your license file (
.mb). - Step 3: back in the studio, drag the license file onto the drop zone in the panel (or double-click the zone to browse for it).
Licenses activated offline never connect to the internet again.
4.5 Deactivating / moving to another computer
Your license covers up to 2 of your own computers (one license per person). To free up a machine:
License (bottom bar) → Deactivate (red button).
- Requires an internet connection (it tells the server that seat is now free).
- Deletes the local license; the plugin returns to its unactivated state.
- Important: always deactivate with the button — not by deleting files or wiping the drive. If you remove the local license without deactivating, that machine still counts as occupied. If that happens, contact support to release it.
- Offline-activated licenses have no Deactivate button: to move them, handle it through the website or support.
On that same screen you can see your activation details: license type (Online / Offline), email and License ID.
4.6 Day-to-day use and working offline
With an online license, Streamers Pro revalidates with the server occasionally and silently. If your machine goes offline (or a proxy/VPN is blocking), the plugin keeps working normally for a 14-day grace period, showing the exact deadline on screen. Get back online at any point before that date and the counter resets itself. And remember (4.2): even if validation fails, the plugin never shuts down in the middle of an open session.
4.7 One Mac, two activations (the Rosetta case)
If you use the plugin in a native Apple Silicon DAW and also in one running under Rosetta, each mode stores its own activation — it may ask you to activate twice on the same Mac. That’s normal.
5. Quick start
- Create an instrument track in Pro Tools and insert Streamers Pro in its instrument slot. (It’s an instrument, not an effect: it doesn’t go on audio-track inserts.)
- Activate if it’s the first time (section 4).
- Look at the plugin’s bottom bar. If it says
Kaizen Overlay needs access, click Grant and grant the permission — exact steps in section 9. One minute, once per machine. - Open your session’s video window. The status changes to
Detected: Video - 1920x1080(or whatever the size is): the overlay is now anchored to the video. - Click TEST on Box 1: you’ll see the green streamer sweep the picture and the punch land at the end. That’s a cue.
- Markers: drop a Pro Tools memory location on the frame where the actor should come in and hit play a few seconds earlier. The streamer completes and the punch lands exactly on the marker. Which box each marker lane fires is set per box (section 12); out of the box, everything goes to Box 1.
- The marker’s text shows up as a subtitle over the video (the dialog line, if that’s how you name your markers). Turn it off per box with
Show nameor globally in Settings. - Cue Strip: in the bottom panel, pick your picture-cut track under
PIC CUT:and switch onCue Strip— the cuts slide under the fixed playhead. The strip refreshes itself every time you save the session;Update Cutspulls the changes right away without saving. - Prefer MIDI? Put notes on the plugin’s track: C3–B3 and C4 fire boxes 1–8. The note marks the start of the streamer (section 11).
6. Streamers, punches and the sync point
A bit of history (and vocabulary)
In classic dubbing, the technician marked the work print with a diagonal line scribed across the film: projected, that mark read as a line crossing the screen for a couple of seconds — the streamer — ending in a punch, a flash punched into the exact frame of the entrance. The actor watched the line come, breathed with it, and hit the punch. Streamers Pro reproduces that language — still the standard in ADR and dubbing — on top of your DAW’s digital video.
The plugin’s model
Each of the 8 boxes is a cue template: type (streamer, punch, countdown…), color, duration, thickness, direction, beep, caption. The trigger — a marker or a note — only decides when that template runs and which of the 8 runs.
The golden rule, at a glance. The two trigger types anchor the cue at opposite ends — it’s the first thing to internalize:
- Pro Tools marker = the END. The marker is the sync point: the streamer arrives and the punch lands exactly on the marker. Put the marker on the entrance frame and forget about it — the streamer’s duration comes from the box, and you can change it anytime without touching a single marker.
- MIDI note = the START. The note launches the streamer, and the punch lands
durationlater. Place the notedurationahead of the target frame (the classic MIDI workflow).In both cases, the duration lives in the box — never in the MIDI clip or the marker text. That’s what makes the system independent of tempo, grid and clip modes.
Why the difference? Markers are read ahead of time from the session, so the plugin can start the streamer before the marked point. A MIDI note arrives in real time: nothing can start “before” it is received.
7. The interface, zone by zone
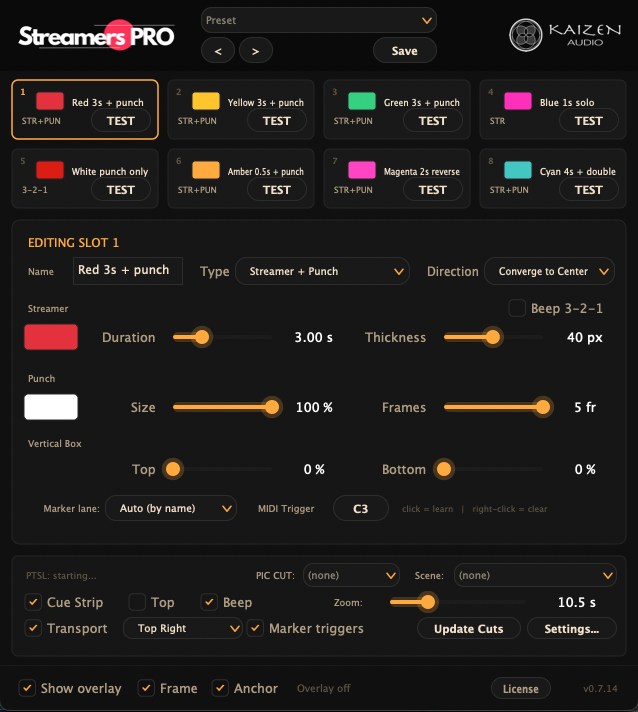
The window has a fixed size. Top to bottom:
| Zone | What’s there |
|---|---|
| Top bar | The animated logo (with streamers sweeping behind it — not casual decoration: it’s the product), the preset bar (< >, menu, Save) and the Kaizen Audio mark |
| The 8 boxes | A 4×2 grid. Each card shows: number (1–8), color swatch, name, type tag (STR, PUN, STR+PUN, 3-2-1, STR+3-2-1), duration and its TEST button |
| Edit panel | EDITING SLOT N — every control of the selected box (section 10), plus Copy / Paste |
| Pro Tools panel | Pro Tools connection status, PIC CUT and Scene selectors, Cue Strip · Top · Beep toggles, Zoom, Transport and its corner, Marker triggers, Update Cuts and Settings… |
| Bottom bar | Overlay · Outline · Follow video, the status line, the Start / Grant button (only when needed), License, version and active renderer |
- Click a card → selects that box for editing. TEST → fires that cue right now, as a preview.
- Settings… opens the Overlay Settings panel, home to every visual setting of the overlay: Cue Strip and Scene sizes and colors, opacities, the frame, the watermark, the caption and sync. Close it with Close, a click outside, or Escape. Full control-by-control reference in the appendix.
- The bottom bar’s status line is your main tell-tale. From highest to lowest priority:
License required — click LICENSE →·Overlay off·Starting Kaizen Overlay...·Kaizen Overlay is not running(with a Start button) ·Update Kaizen Overlay to use the overlay·Overlay active in another instance·Kaizen Overlay needs access(with a Grant button) ·Overlay placed manually - 1280x720·Detected: Video - 1920x1080·Overlay on (no video window detected) - click TEST to preview. - The renderer readout identifies the path currently drawing the overlay:
RENDER: METAL,RENDER: OPENGLorRENDER: OFFLINE. It is diagnostic information; you do not have to choose it by hand.
8. The overlay on top of your video
The overlay is a transparent, borderless window that sits over the video window and lets every click and keystroke pass through: it never steals focus, never intercepts shortcuts, never gets in the way. It stays visible even with the Pro Tools video window blown up to full screen, and it follows you across desktops (Spaces).
- Overlay (bottom bar) turns it on and off. The state is saved with the session.
- Frame draws a thin border around the overlay — handy for seeing exactly what area it covers. Color and thickness are set in Overlay Settings.
- The overlay belongs to the plugin, not to its window: you can close the plugin editor and the overlay stays on screen. To remove it, use the toggle (or remove the insert).
- With no video window in sight, the overlay covers the whole main display and the status says so:
Overlay on (no video window detected) - click TEST to preview. As soon as a video window appears, it snaps to it on its own. - The plugin locates the Pro Tools video window automatically. Move it or resize it and the overlay follows within a second.
- Overlay Scale (in Overlay Settings, 25–300 %): a global scale for everything that gets drawn — streamers, strips, text — to resize it all at once for distant screens or small video windows.
Follow video: automatic and manual mode
The Follow video toggle decides who positions the overlay:
- Follow video ON (factory): the overlay automatically follows the detected video window. The whole overlay is click-through.
- Follow video OFF (manual mode): you place it. The frame turns amber with corner handles: drag the edge to move it and the corners to resize it. The interior still passes clicks through to your DAW — only the edge and the corners are “touchable”.
It belongs to the machine, not to the session. From version 0.8.0 the mode and the position are stored by Kaizen Overlay on your Mac, and shared with every Kaizen Audio plug-in that draws over picture. Place it once and it stays: open another session, or the same plug-in in another DAW, and it is still where you left it. Changing it here changes it for all of them.
Manual mode is the universal fallback: for projectors and rooms where the video goes out a second display, for DAWs with no detectable video window, or for working without the Accessibility permission (section 9).
The position belongs to the machine, not to the session. From version 0.8.0 the frame is stored by Kaizen Overlay on your Mac: place it once and it stays for every session, every DAW and every Kaizen Audio plug-in that draws over picture. Coming from an older version, whatever position your sessions had saved is discarded — place it once more and you’re done.
One overlay window at a time
Only one Streamers Pro instance draws at a time. The most recent one wins: insert a second instance and it takes over, while the first shows Overlay active in another instance. Close the one that is drawing and the other one takes over again by itself — no need to toggle anything.
Watermark (studio branding)
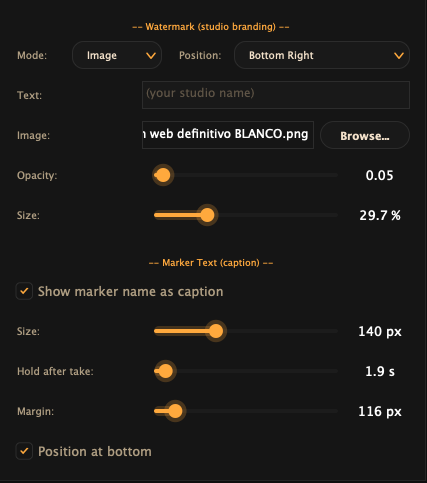
In Overlay Settings, Watermark section: Mode (Off / Text / Image), position (corners or center), opacity and size. With Text you type the studio name; with Image you load your logo (PNG/JPG). It draws discreetly over the video — for rooms that want to sign the projection or brand the captures of remote sessions.
Performance
The overlay draws on events: if nothing is moving (no active cue, no Cue Strip in playback), GPU cost is practically zero. It pays no rent for being on screen.
9. Kaizen Overlay and the Accessibility permission
Who draws the overlay
Streamers Pro does not draw the overlay itself. Kaizen Overlay does — a small application the installer places in /Library/Application Support/Kaizen Audio/, and which draws the overlay for every Kaizen Audio plug-in that works over picture.
You don’t have to do anything with it. It has no Dock icon and no window of its own, it starts itself when you insert the plugin and quits itself a few seconds after you close the last one. There are three concrete reasons it is a separate application rather than part of the plugin:
- It works in Logic. Logic loads Audio Unit plug-ins in an isolated system process, and there macOS does not honour a plugin-created window letting clicks through: the mouse gets trapped by the overlay and the Mac appears frozen. With the window owned by its own application, clicks pass through as they should.
- The permission is granted once. See below.
- One overlay for all. If you run Streamers Pro alongside another Kaizen Audio plug-in over the same picture, they share a single frame instead of stacking two windows.
If Kaizen Overlay isn’t running for any reason, the bottom bar says so (Kaizen Overlay is not running) and a Start button appears. Streamers Pro will never open a window of its own.
The Accessibility permission
To locate and follow the video window automatically, Kaizen Overlay uses the macOS Accessibility API. It is the only system permission needed — and macOS requires you to grant it yourself, by hand, once per machine.
The good part: you grant it to “Kaizen Overlay”, not to your DAW. Once, and it covers every Kaizen Audio plug-in and every DAW you use. (Up to version 0.7.27 it had to be granted to the DAW — “Pro Tools” in the list — which confused everyone, and in Logic was flatly impossible.)
Fast path (recommended): the Grant button
- Insert the plugin with your DAW open. If the permission is missing, opening the plug-in window raises a notice — Accessibility permission needed — with a Grant button. Dismiss it with Later and the permission is still missing: the bottom bar keeps reminding you with
Kaizen Overlay needs accessand its own Grant button. - Click Grant. Two things happen: macOS shows its standard Accessibility dialog, and System Settings → Privacy & Security → Accessibility opens with Kaizen Overlay already added to the list.
- Turn its switch on (macOS will ask for your password or Touch ID).
- Go back to the plugin. Within a second or two the status changes to
Detected: Video - …and the Grant button disappears. No need to restart your DAW: the permission belongs to a separate application, not to your host.
Manual path (without the button)
System Settings → Privacy & Security → Accessibility. If Kaizen Overlay is already in the list, turn its switch on. If it isn’t, click +, go to /Library/Application Support/Kaizen Audio/ and add Kaizen Overlay.app.
What works without the permission
Everything except automatic following:
- The overlay still opens (full screen on the main display).
- Cues, beeps, captions, Cue Strip, markers and MIDI all work at 100%.
- With Follow video OFF you can fit the overlay over the picture by hand, with full precision (section 8).
In other words: the permission buys you the convenience of the overlay chasing the video window by itself. Without it, you place it.
Coming from an older version: remove the permission from your DAW
Up to 0.7.27 the permission had to be granted to the DAW, so your Accessibility list will show Pro Tools (or Logic). It does nothing any more: from 0.8.0 the plug-in doesn’t use the Accessibility API at all — Kaizen Overlay does. You can remove your DAW from that list safely; nothing in the plug-in will stop working.
And the other way round: even if you granted it to Pro Tools years ago, you will see the prompt again after updating, asking for it for Kaizen Overlay. That is correct — it is a new permission, for a different application. Grant it once and it covers every DAW you use.
And for the record
- Neither Streamers Pro nor Kaizen Overlay uses Screen Recording: they don’t capture, read or record any pixels from your screen — they only draw on top. If you ever see “Screen Recording” requested by some software, it isn’t this.
- Neither uses microphone, camera or Apple Events.
- When you update Streamers Pro, the permission survives: Kaizen Overlay is code-signed and macOS recognises it as the same application. You don’t have to grant it again on every update.
10. The 8 boxes: anatomy of a cue
Select a card and the EDITING SLOT N panel shows all its controls.
Type and direction
| Control | Options | What it does |
|---|---|---|
| Type | Streamer + Punch (factory) · Streamer only · Punch only · Streamer + 3-2-1-REC · Countdown 3-2-1-REC | What the cue draws. The last two add the visual countdown: four flashes, at −3 s, −2 s, −1 s and the REC on the sync point (section 14) |
| Direction | Left to Right (factory) · Right to Left · Converge to Center · Converge 1/4 Left · Converge 1/4 Right | The streamer’s travel. The three Converge variants draw two lines that meet exactly on the GO: at the center, or a quarter of the screen in from the left/right edge — handy for marking entrances away from picture center |
Right to Left is the classic “outgoing” — the exit mark of a take or a loop, sweeping the other way.
Streamer
| Control | Range (factory) | What it does |
|---|---|---|
| Color (swatch) | free RGB picker | The line’s color. Each box has its own — the color code is your language with the actor |
| Duration | 0.1–10 s (2.0 s) | How long the line takes to cross. This is THE cue duration: with markers, the streamer starts this long before the marker |
| Thickness | 1–80 px (10 px) | Line thickness (referenced to 1080p; scales with the actual video size) |
Punch
| Control | Range (factory) | What it does |
|---|---|---|
| Color (swatch) | free RGB picker | The flash color (white from the factory) |
| Size | 1–100 % (30 %) | Punch diameter as a percentage of the picture height (100 % = top to bottom) |
| Frames | 1–5 fr (2 fr) | Flash length, in screen frames (at 60 Hz: 1 fr ≈ 16 ms, 5 fr ≈ 83 ms) — not session frames |
The punch finish is set globally in Overlay Settings with Punch glow: at 100 % it’s a soft flash with a halo; at 0 %, the hard, dry circle of the classic punched hole.
Vertical Box
| Control | Range (factory) | What it does |
|---|---|---|
| Top | 0–95 % (0) | Crops the cue from the top |
| Bottom | 0–95 % (0) | Crops the cue from the bottom |
Confines streamers and punches to a horizontal band of the picture — to stay clear of subtitles or the letterbox, for instance, or to draw the cue over the action area only.
The box’s two toggles
- Show name (ON from the factory) — shows the marker text as a subtitle when this box fires (section 13).
- Beep 3-2-1 (OFF from the factory) — arms the countdown beeps on this box (section 14).
Box routing
On the same row live the box’s two “input jacks”:
- Marker lane: which Pro Tools marker lane fires this box (section 12).
- MIDI Trigger: the note that fires this box — click to learn (play the note), right-click to clear (section 11).
Copy / Paste
Copy copies the box’s look and behavior (type, direction, both colors, duration, thickness, punch, Vertical Box, beep, caption). Paste applies it to another box keeping its name, its lane and its MIDI note — it copies the “look”, not the wiring. Perfect for keeping a whole session visually consistent while only the color changes.
The factory bank
| Box | Name | Type | Duration | Color | Made for |
|---|---|---|---|---|---|
| 1 | ADR Standard | Streamer + Punch | 2.0 s | Green | The standard dialog cue |
| 2 | Quick ADR | Streamer + Punch | 1.0 s | Yellow | Fast entrances, retakes |
| 3 | 3-2-1 Countdown | Streamer + 3-2-1-REC | 3.0 s | Amber | Take starts with a full countdown |
| 4 | Foley Hit | Streamer + Punch | 0.5 s | White | Foley hits, dry sync points |
| 5 | Music Cue | Streamer + Punch | 4.0 s | Magenta (Converge 1/4 Left) | Musical entrances, with a long run-up |
| 6 | Outgoing | Streamer + Punch | 1.5 s | Cyan (Right to Left) | Exits and loop ends |
| 7 | Hit Only | Punch only | — | Red | Just the flash, no anticipation |
| 8 | Heads-up | Streamer only | 2.5 s | Orange | A “get ready” warning with no punch |
Everything is editable; this is just the starting point. To come back to it: preset menu → Reset to Factory... (section 17).
11. Triggering with MIDI
The classic MIDI workflow: put notes on the plugin’s track and each note fires its box. If you’ve cued streamers over MIDI in other tools, you’ll feel at home — instrument track, short notes, and the note marks the streamer’s entrance.
The note map
From the factory, the white keys from C3 to C4 (with middle C = C3, the Pro Tools and Logic convention):
| Box | 1 | 2 | 3 | 4 | 5 | 6 | 7 | 8 |
|---|---|---|---|---|---|---|---|---|
| Note | C3 | D3 | E3 | F3 | G3 | A3 | B3 | C4 |
Each box can change its note under MIDI Trigger (edit panel): click the note button → Press a key... → play the note on your keyboard or click one into the MIDI editor; right-click → clears the assignment (-). One note can only fire one box: assign a note another box was using and that box loses it.
Ground rules
- The note is the START of the streamer. The punch lands
Durationseconds later. Place the noteDurationahead of the target frame. (If the box has beep or countdown enabled, the sync point moves to note + 3 s — see section 14.) - Channel and velocity are ignored. Any note-on with the right pitch fires. Note length doesn’t matter — a tick is enough.
- It also works with the transport stopped: play the note on a MIDI keyboard routed to the track and the cue fires instantly. Handy for throwing cues “by hand” in rehearsals.
- Triggering automatically compensates the session’s delay and your Sync Offset (Mac) (section 16), just like markers: both paths land identically on screen.
Fine print: some sequencers encode note-off as “note-on with velocity 0” — those events don’t fire (correctly: they’re releases, not notes).
Setup per DAW
- Pro Tools: instrument track → Streamers Pro in the instrument slot → MIDI clips on that same track. Nothing else to route.
- Logic: software instrument track → Streamers Pro as the instrument → notes on the track.
- Other DAWs (VST3): the same — it’s an instrument that receives MIDI.
12. Triggering with Pro Tools markers
The star mode. The plugin reads your session’s memory locations by itself — via PTSL, Pro Tools’ local scripting service — and fires cues against the real timeline. No MIDI, no exporting, nothing to touch in Pro Tools: with Pro Tools 2025.06 or later open, the connection is automatic.
The connection
The Pro Tools panel shows the state live: Connecting to Pro Tools... → Connected to Pro Tools → a healthy line like Connected (137 tracks) | MYFILM_R3_ADR — with the session name at the end, so you always know which session it is reading. If Pro Tools isn’t open you’ll see Connection failed - retrying: not an error, just the wait; the moment Pro Tools launches, it connects by itself.
How a marker fires
- The plugin reads the session’s markers continuously (changes show up within a second, during playback too).
- On playback, as the playhead approaches a marker, the streamer starts early — exactly
Durationseconds early — and the punch lands dead on the marker. The marker is the sync point (section 6). - The marker’s name appears as a caption if the box has it enabled (section 13).
Rules:
- Point markers fire; selection memory locations are ignored.
- Only during normal playback (not scrubbing, not stopped, not FFW).
- Start playback with headroom: if you hit play closer to the marker than the streamer’s duration (or less than 3 s if the box has beep/countdown), that marker won’t fire on that pass — the cue would have had to start “in the past”. Practical rule: 5 seconds of pre-roll and never think about it again.
- In a loop, it fires on every pass.
- The Marker triggers toggle (Pro Tools panel, ON from the factory) kills the whole marker system in one click if you’d rather work MIDI-only.
Marker lane → box: who fires what
Pro Tools organizes markers in lanes (the main ruler plus named marker rulers/tracks). Streamers Pro turns that into the routing:
- In each box, the Marker lane combo lists the lanes detected in the session (the main ruler shows as
Markers; the others by their name). Assign each box the lane you want. - The assignment is saved with the session. (If two boxes ever pointed at the same lane, the lowest-numbered one fires.)
- Everything unassigned goes to Box 1. From the factory nothing is assigned: any marker fires Box 1 — it works out of the box with any session.
Unassigned= this box listens to no lane (MIDI/TEST only).
The typical ADR setup: an “ADR” lane for dialog entrances → Box 1 (green, 2 s); an “FX” lane → Box 4 (white, 0.5 s); a “MUS” lane → Box 5. Every department sees its own color and timing, in the same pass.
Lanes are detected through the markers they contain: an empty lane won’t show in the combo until it has at least one marker.
13. The marker text on screen (caption)
If the marker is named after the dialog line (“You talkin’ to me?”), the actor sees it as a subtitle over the video while the streamer runs — from the start of the cue until a couple of seconds past the GO. White text with an outline on a dark box, professional subtitle style.
Two switches, both ON from the factory:
- Per box: the
Show nametoggle in the edit panel. - Global:
Show marker name as captionin Overlay Settings (Marker Text section).
And in that same Overlay Settings section, the fine-tuning:
| Control | Range (factory) | What it does |
|---|---|---|
| Size | 8–400 px (48) | Text size |
| Hold after take | 0–30 s (2.0 s) | How long the text holds after the GO |
| Margin | 0–1000 px (60) | Distance from the edge |
| Position at bottom | ON/OFF (ON) | Bottom (subtitle) or top (title card) |
| Text color | picker (white) | The text color |
With Overlay Settings open, the overlay shows a sample caption (Example dialogue line) so you can dial size and position while seeing the real thing.
Only marker-fired cues carry text (it’s the marker’s name). MIDI and TEST cues show no caption.
14. Beeps: the 3-2-1 countdown
The audible version of the streamer: three beeps (1 kHz, short) across the last three seconds and silence on the GO — the actor comes in “on the fourth beep”, which never sounds. It’s the dubbing-stage convention, and the musician’s count-off.
The two switches (in series)
At a glance: for a box to sound, both switches must be on — the master
Beepin the Pro Tools panel and the box’s ownBeep 3-2-1. From the factory both are off: the plugin ships in complete silence.
- Master
Beep(Pro Tools panel): the room’s main switch. Beep 3-2-1(per box): which cues carry a countdown. Typical: ON for the take-start box, OFF for the rest.Beep Volume(Overlay Settings): 0–100 % (35 % from the factory).
The 3-second rule
A cue with beeps (or a visual countdown) needs at least 3 seconds of anticipation for the three beeps to fit. The plugin guarantees it by itself: on those cues, the sync point always sits 3 s after the cue starts — even if the streamer is shorter. A 1 s streamer with beeps starts “mid-count” (on the −1 beep) and still closes dead on the GO. The payoff: the countdown sounds identical on every cue, whatever their streamer lengths.
The Streamer + 3-2-1-REC and Countdown 3-2-1-REC types add the visual count on top: four flashes — 3, 2, 1 and the REC on the GO. Mind the nuance: the audible beeps are three (the GO is silent); the flashes are four (the REC is seen, not heard).
Where they come out
Through the plugin track’s audio output — the only audio Streamers Pro generates. Route it to the actor’s headphones (foldback/cue mix) and keep it out of the mix. Behavior details:
- With markers, beeps only sound during playback (like the cues).
- With MIDI and TEST, they always sound — transport stopped included. A TEST with beeps armed is the quick way to check the headphone routing.
15. Cue Strip, Scene and the transport icon
The Cue Strip
Our favourite invention — and, once you’ve tried it, the one you won’t work without. A horizontal strip over the video, tape-machine style: the playhead is an amber line fixed at the center, and the clips of one track of your session slide under it as the host plays. At a glance you see which shot is playing, how much is left and what’s coming — without taking your eyes off the picture.
It was born for ADR, but it stays for everything: mixing included. With the picture-cut track on the strip you see every shot change coming seconds ahead — fades, transitions and mix moves stop catching you by surprise. At Kaizen we now keep it on in every session by default.
- Each clip is a block proportional to its real length, with alternating colors (A/B) so the cuts read at a glance.
- The active clip fills with color from its left edge up to the playhead — a progress bar for the current shot.
- On the strip you also get the cue marks: a vertical line in each box’s color at the sync point of every scheduled marker. You see the cues coming before they start.
Configuration (Pro Tools panel):
PIC CUT:— pick the track whose clips you want to see. It’s designed for the picture-cut / shot-change track your editor prepares, but it accepts any track in the session, visible or hidden.Cue Strip— the strip’s toggle.Topmoves it to the top edge (it lives at the bottom by default).Zoom:— the visible time window (2–600 s; the factory 30 s ≈ 6–10 shots around the playhead).Update Cuts— reloads the clips from Pro Tools. The strip refreshes on its own every time you save the session (Cmd+S): when a new cut arrives, importing it and saving is enough. Click this button to pull changes without saving. (On opening a session or connecting, the strip fills by itself within seconds.) There is no continuous polling: reading the edit is expensive, so it only runs in those three cases.
In Overlay Settings you tune the look: Strip Height (80 px), Border Width, Cue Strip Opacity and the strip’s four colors (Inactive clip A/B, Active clip, Border color).
Empty states: LOADING CUE STRIP... (fetching from Pro Tools) and EMPTY CUE STRIP (the chosen track has no clips). The clips it reads are saved with the session: reopen it and the strip appears instantly, even before Pro Tools finishes launching.
Scene: the second strip
Under Scene: you pick a second track — typically the scene/sequence track (one clip per scene: “SC 102”, “SC 103”…). A second strip appears, hugging the edge (the PIC CUT strip sits inside it, toward picture center), with its own color set in Overlay Settings. One playhead crosses both.
Two simultaneous reading levels: the scene you’re in and the shot that’s running. If the chosen Scene track has no clips, its strip says so independently.
The two strips are really generic block viewers: both
PIC CUT:andScene:take whatever track you want — cuts, scenes, a VO guide, the structure of the song… The names reflect what they were born for, not a limit.
The transport icon
A tell-tale of the Pro Tools transport state, drawn in a corner of the overlay — so the room always knows whether it’s rolling:
- PLAY = green triangle · REC = red circle · STOP = grey square · FFW/RWD = amber double arrows · scrub = dim amber circle.
Transporttoggle + corner combo (Top Left / Top Right / Bottom Left / Bottom Right). Size, margin and opacity in Overlay Settings.- Independent of the Cue Strip: run just the icon, just the strip, or both.
FF/REW
During fast-forward/rewind, Pro Tools doesn’t play audio through the plugin, so the strip would go blind. Streamers Pro detects FFW/RWD and slides the strip at the speed you set under FF/REW Speed: (Overlay Settings; 300 % from the factory). Match it to the value in your Pro Tools preferences (Operation) so the strip tracks the shuttle faithfully.
16. Sync: Auto PDC and Sync Offset (Mac)
The punch landing dead on the frame is the plugin’s whole reason to exist, and two compensations make it happen — one automatic, one yours.
Auto PDC (automatic)
Your session’s plugins introduce delay compensation (PDC). Streamers Pro reads it from Pro Tools and compensates on its own, silently. Overlay Settings shows the readout:
Auto PDC: 19200 smp (400.0 ms / 9.60 fr) | FPS: 23.976
Auto PDC: DC disabled— the session has Delay Compensation off (the plugin compensates nothing, as it should).Auto PDC: 0 (PT reports none / RPC unavailable)— Pro Tools reports no delay, or the version doesn’t expose it (needs 2024.06+).FPS:— the session’s frame rate, read from Pro Tools.
Sync Offset (Mac): YOUR room’s latency
The one thing no session can know: how long your video chain — projector, TV, HDMI matrix — takes to put the frame on screen. In Pro Tools that’s what the Video Sync Offset compensates (Setup → Video Sync Offset); Streamers Pro needs the same number for its streamers, and that value can’t be read from outside. So you give it once:
Sync Offset (Mac):in Overlay Settings — in milliseconds (±2000 ms), with-1 fr/+1 frbuttons that step exact session frames, and the frame equivalent right next to it (= 4.44 fr @ 23.98 fps).- Positive = everything later (the picture arrives late, the cues must wait for it). If you already know your Pro Tools Video Sync Offset, type the same value here and you’re done.
- It is stored on THIS Mac, not in the session. It’s a room setting: set once per machine, it applies to every session opened on it. Sessions and presets never overwrite it — load another studio’s preset without inheriting their room.
To calibrate by eye: marker on an unmistakable frame (a slate, a hard cut), play with headroom, and nudge ±1 frame until the punch lands where it should.
TEST compensates nothing — it fires instantly, as a visual preview. To judge sync, always use a marker (or a note) in real playback.
17. Presets: what travels with the session and what doesn’t
With the session (no action needed)
The 8 boxes, the MIDI map, the lane assignments, the chosen PIC CUT/Scene tracks and every overlay setting are saved inside the Pro Tools session, like any plugin state. Open the session tomorrow and it’s all there.
Presets (.streamerspreset)
The top bar manages full-state presets — to carry your setup from room to room or hand it to the team:
- Center menu — factory first (
ADR Standard,Foley,Music Cue,High Visibility), then yours. </>— previous / next preset.- Save — saves under a name (asks before overwriting).
Reset to Factory...— returns the 8 boxes, the MIDI map and the settings to factory. Your preset files are untouched.Open Presets Folder— opens your presets folder in the Finder:~/Documents/Kaizen Audio/Streamers Pro Presets/(.streamerspresetfiles). Copy them, back them up or move them between machines like regular files.
Coming from a version older than 0.7.27: your presets used to live in
~/Library/Kaizen Audio/Streamers Pro/Presets/, a hidden folder. The first time you open the plugin they move to the Documents folder on their own, with their names and dates intact, and the old folder disappears. If it held anything that wasn’t one of our presets, it stays where it is with whatever was inside.
A preset stores the plugin’s entire state: the 8 boxes, the MIDI map, the strips’ look, the caption, the watermark, the overlay toggles. Deliberately left out:
- The PIC CUT and Scene tracks (they belong to each session — another project’s preset shouldn’t switch your tracks).
- The Sync Offset (Mac) (it belongs to each room — section 16).
One honest footnote: a preset includes the
Overlaystate. The frame position and theFollow videomode no longer: from 0.8.0 they belong to the machine and are stored by Kaizen Overlay, so loading someone else’s preset will not move your overlay.
18. DAW notes and known limitations
Pro Tools
- The full experience: markers, Cue Strip, Scene, transport, Auto PDC, MIDI. Native AAX, on an instrument track.
- The session integration (PTSL) requires Pro Tools 2025.06+. On older versions the plugin loads and works over MIDI, but the track list or the Cue Strip may stay empty and you’ll see
Connected (...)states with error detail. - After installing or updating: Cmd+Q and relaunch (Pro Tools caches its plugin list between launches).
- Two Pro Tools instances open at once? The plugin talks to Pro Tools’ single local service; check the status line (the session name) to confirm which one it is reading.
Logic
- Via Audio Unit, as a software instrument (it’s not under Audio FX). MIDI, overlay, TEST, beeps: everything works.
- From version 0.8.0 the overlay works normally in Logic. In earlier versions, inserting the plugin with the overlay on trapped the mouse and made the Mac appear frozen: Logic loads Audio Units in an isolated process, and there macOS did not honour the overlay window letting clicks through. The window is now created by Kaizen Overlay, a separate application, and the problem is gone. If you are on a version older than 0.8.0 and you use Logic, update.
- Markers, Cue Strip and transport are Pro Tools-exclusive (they read its session). In Logic the Pro Tools panel will show
Connection failed - retrying: normal and harmless. - Careful if Pro Tools is open in parallel: the plugin will connect to that Pro Tools and read its session (markers included), even though you’re playing back in Logic. In that scenario, switch off
Marker triggersandCue Strip.
Nuendo / Cubase / Studio One / Reaper / Live
- Via VST3, as an instrument. Same picture as Logic: MIDI yes; PTSL/markers/Cue Strip no (they’re Pro Tools’).
General
- The overlay is macOS (this version is macOS-only; Windows is in development).
- Only one instance owns the overlay at a time (section 8).
- The plugin neither plays nor processes your tracks’ audio: it’s a silent instrument whose only output is the beeps.
19. Troubleshooting
I can’t see the overlay anywhere.
Three suspects, in order: ① License active? (bottom bar: License required — click LICENSE →). ② Overlay on? ③ Another instance holding it? (Overlay active in another instance — close it, or switch its Overlay off). ④ Is Kaizen Overlay running? (Kaizen Overlay is not running — click Start).
The overlay doesn’t follow the video window.
The Accessibility permission is missing (section 9). The status says so: Kaizen Overlay needs access → Grant button. The switch to turn on in System Settings is Kaizen Overlay’s, not your DAW’s.
I granted the permission and nothing changed. Quit the DAW completely and relaunch (macOS sometimes doesn’t apply the permission to already-running apps). Also check the switch you enabled belongs to the right DAW (Pro Tools, and not an old duplicate copy?).
The overlay covers the whole screen instead of the video.
No video window detected (status: Overlay on (no video window detected)...). Open the session’s video window — or go manual (Follow video OFF) and fit it yourself.
Markers don’t fire anything.
In order: are you playing? (nothing fires stopped or scrubbing) · Marker triggers ON? · is the marker a point marker? (selections are ignored) · did you start playback with headroom? (at least the streamer’s duration before the marker; 3 s with beeps) · is the marker’s lane assigned to a different box than you expected? (anything unassigned goes to Box 1).
The punch doesn’t land on the frame (constant offset).
That’s your room: calibrate Sync Offset (Mac) (section 16) — same value as your Pro Tools Video Sync Offset. And check the Auto PDC readout in Overlay Settings (if it says DC disabled, your session has Delay Compensation off).
TEST looks out of sync with the markers. Normal: TEST is an instant preview and applies no compensation. Judge sync with a marker in real playback, always.
The Cue Strip is empty.
Right track under PIC CUT:? Does it have clips? Did you save (or hit Update Cuts) after the editor’s latest changes? If the status shows Connected (PIC CUT export... with an error, check the Pro Tools version (2025.06+).
The Cue Strip is stuck on “LOADING CUE STRIP…”.
Huge sessions take a while (the read can run several seconds). Wait, or hit Update Cuts again. Retry with Pro Tools idle (not mid-save or mid-import).
The beeps don’t sound.
The two switches: master Beep (Pro Tools panel) and the box’s Beep 3-2-1 — both ON. Then: Beep Volume above 0, the plugin track’s output routed/monitored to the headphones, and remember that with markers beeps only sound during playback (try TEST: it sounds while stopped too).
Permanent Connection failed - retrying (in Pro Tools).
Is Pro Tools open, and is it 2025.06+? If you run a strict firewall, allow Pro Tools’ local connections (local service, port 31416 on the machine itself — nothing goes out to the internet).
Pro Tools doesn’t show the plugin after installing/updating.
Quit Pro Tools completely (Cmd+Q) and relaunch. Last resort: delete ~/Library/Preferences/Avid/Pro Tools/InstalledAAXPlugIns and let it rescan.
It doesn’t show up in Logic. It’s an instrument: look in the instrument selector of a software instrument track (not in Audio FX). If it still doesn’t appear, restart your Mac (forces the Audio Unit rescan).
“Online validation failed” on screen. The plugin can’t reach the server (offline? VPN? proxy?). You have a 14-day grace period with the deadline shown; get back online before that date. The running session never locks. Section 4.6.
I want to move my license to another Mac. License → Deactivate on the old machine; activate on the new one. Section 4.5.
Support: hello@kaizen.audio — write from your account email and include plugin version, DAW and OS. Error messages in the license panel can be selected and copied directly.
20. Specifications
| Plugin type | Virtual instrument (generator). Does not process track audio |
| Input | MIDI (cue triggering) |
| Audio output | Stereo — countdown beeps (1 kHz), optional |
| Visual output | Transparent click-through overlay over the DAW’s video window: streamers, punches, 3-2-1-REC countdowns, captions, Cue Strip + Scene, transport icon, watermark |
| Triggers | Pro Tools markers (marker = sync point) · MIDI notes (note = streamer start) · TEST |
| Accuracy | Sample-accurate triggering; automatic session PDC compensation + per-machine room offset |
| Frame rates | 23.976 – 120 fps, drop-frame included (rate read from the Pro Tools session) |
| Sample rates | Any host rate (timing is real-time, independent of sample rate and tempo) |
| Added latency | None — the plugin sits outside the audio path |
| Pro Tools integration | PTSL (local scripting service): markers, track list, clips, transport, PDC, frame rate. Read-only — it never modifies the session |
| CPU / GPU | Minimal; the overlay draws on events (practically zero at idle) |
| macOS permissions | Accessibility, granted to the Kaizen Overlay app (video-window following). Screen Recording is not used |
| Formats | AAX · VST3 · AU — macOS 12+, universal (Apple Silicon + Intel), signed and notarized |
21. Appendix: every Overlay Settings control
The Overlay Settings window (the Settings… button in the Pro Tools panel) gathers every visual and sync setting of the overlay. Complete reference, in on-screen order:

Sizes
| Control | Range (factory) | What it does |
|---|---|---|
| Strip Height | 5–300 px (80) | Height of each strip (Cue Strip and Scene share it) — section 15 |
| Border Width | 0–12 px (3) | Border thickness of the clip blocks |
| Transport Size | 10–200 px (22) | Transport icon size |
| Transport Margin | 0–400 px (14) | Icon distance from its corner |
| Frame Width | 1–12 px (2) | Thickness of the overlay frame (the Frame toggle’s frame) |
Opacities
| Control | Range (factory) | What it does |
|---|---|---|
| Cue Strip Opacity | 0–100 % (100 %) | Strips’ opacity |
| Streamer/Punch | 0–100 % (100 %) | Streamers’ and punches’ opacity |
| Punch glow | 0–100 % (100 %) | The punch finish: 100 % = soft flash with halo; 0 % = the hard, dry circle of the classic punched hole |
| Transport Icon | 0–100 % (100 %) | Transport icon opacity |
Sync and behavior
| Control | Range (factory) | What it does |
|---|---|---|
| Sync Offset (Mac) | −2000…+2000 ms (0) | Your video chain’s latency, stored on this Mac — with -1 fr / +1 fr buttons and a frames readout beside it. Section 16 |
| Auto PDC / FPS (readout) | — | Diagnostics: the delay compensation read from the session and the frame rate. Not editable — informational |
| FF/REW Speed | 50–3200 % (300 %) | Strip speed during fast-forward/rewind; match it to your Pro Tools preferences. Section 15 |
| Overlay Scale | 25–300 % (100 %) | Global scale of everything drawn on the overlay |
| Beep Volume | 0–100 % (35 %) | Countdown beep level. Section 14 |
PIC CUT strip colors
| Control | Factory | What it does |
|---|---|---|
| Inactive clip A | light grey | First color of the alternating blocks |
| Inactive clip B | mid grey | Second color of the alternating blocks |
| Active clip | amber | The progress fill of the current clip |
| Border color | translucent black | Block borders |
Scene strip colors
The same four controls, for the Scene strip. Factory-identical to PIC CUT — differentiate them if you run both strips at once.
Frame
| Control | Factory | What it does |
|---|---|---|
| Frame color | translucent dark grey | The overlay frame’s color |
Watermark (studio branding) — section 8
| Control | Options / range (factory) | What it does |
|---|---|---|
| Mode | Off · Text · Image (Off) | Off, text or image |
| Position | Top Left · Top Right · Bottom Left · Bottom Right · Center (Top Right) | Where it draws |
| Text | free text | The studio name (with Mode = Text) |
| Image + Browse… | PNG / JPG | Your logo (with Mode = Image) |
| Opacity | 0–100 % (50 %) | Watermark transparency |
| Size | 1–100 % (5 %) | Size relative to the picture |
Marker Text (caption) — section 13
| Control | Range (factory) | What it does |
|---|---|---|
| Show marker name as caption | ON/OFF (ON) | The caption’s global switch |
| Size | 8–400 px (48) | Text size |
| Hold after take | 0–30 s (2.0 s) | How long it holds after the GO |
| Margin | 0–1000 px (60) | Distance from the edge |
| Position at bottom | ON/OFF (ON) | Bottom (subtitle) or top (title card) |
| Text color | white | The text color |
All of these travel with the session (and with your presets) — except
Sync Offset (Mac), which belongs to each machine (section 16).
Streamers Pro is a product of Kaizen Audio Group SL — kaizen.audio Pro Tools and AAX are trademarks of Avid Technology. macOS and Logic are trademarks of Apple Inc. All trademarks are the property of their respective owners.