
Latest update
What’s new in v0.7.16
- The input meter now stays alive when AXIS is inserted on a stereo track, so it no longer looks inactive while the host is still presenting a two-channel bus.
- The DAW workflow is now explicit: in Nuendo, place stereo material on a surround track and insert AXIS there; in Logic and Pro Tools, insert it on a stereo track and choose the required output variant.
AXIS Upmixer — User Manual
Manual version v0.7.16 · September 2026 · Kaizen Audio
Contents
- Introduction
- System requirements
- Installation
- Licensing: trial, activation and deactivation
- Quick start
- The interface, zone by zone
- The 5 modes (engines)
- The Downmix Lock and the Ø button
- Upmix controls (CONTROL tab)
- The radar (visualizer)
- MIXER tab
- SETTING tab
- ABOUT tab
- Presets and A/B comparison
- Ceiling objects in Pro Tools (CEILING OBJ)
- DAW notes and known limitations
- Troubleshooting
- Specifications
1. Introduction
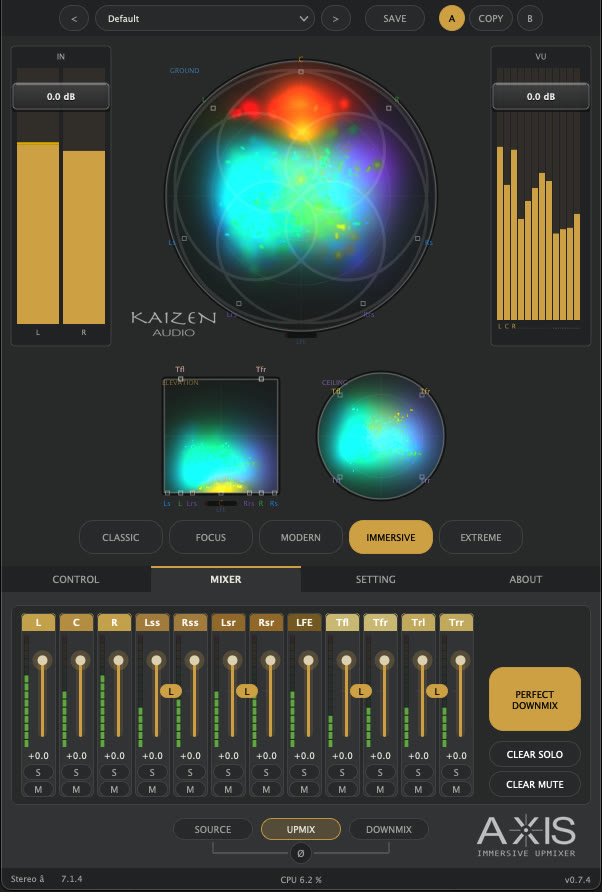
AXIS Upmixer turns a stereo signal into an immersive multichannel mix: from 5.0 up to 9.1.6 (Dolby Atmos Home). It is built for film and TV post-production, immersive music and Atmos mastering.
The core idea: spread your stereo across the whole room without giving up the original mix. Which brings us to its defining feature:
The Downmix Lock
When a multichannel mix is played on a stereo device (a TV, headphones, a radio), the player “folds” it down to two channels using the standard ITU-R BS.775 coefficients. With most upmixers, that fold-down returns something close to the original stereo — but not the same: levels, timbres and phase shift around.
With AXIS, the fold-down returns exactly the original stereo, sample by sample. It is a round-trip guarantee: you spread the mix across the room and, if anywhere down the chain it gets folded back to stereo, what comes out is the master you approved. For broadcast, film and dual deliveries (immersive + stereo), this removes an entire round of approvals.
The Downmix Lock is always on in 4 of the plugin’s 5 modes (all except EXTREME, which deliberately trades it away to allow effects that would be impossible with the guarantee in place). It is not a button — it is part of the design. And you can verify it yourself at any time with the Ø button (see section 8).
What goes in, what comes out
- Input: stereo (2 channels).
- Output: 5.0 · 5.1 · 7.0 · 7.1 · 5.1.2 · 5.1.4 · 7.1.2 · 7.1.4 · 7.1.6 · 9.1.4 · 9.1.6. In Pro Tools you pick the variant when inserting the plugin on your stereo track; in other DAWs it adopts the track’s bus format. In 5.0 and 7.0 (sub-less formats, typical of broadcast and surround music) the LFE controls are locked — there is no sub channel to feed, and no bass is lost: the low end always lives in L/R.
- Plugin formats: AAX (Pro Tools), VST3, AU (Logic) — macOS only for now.
2. System requirements
| Operating system | macOS 12 (Monterey) or later |
| Processor | Apple Silicon or Intel (native universal binary) |
| Formats | AAX · VST3 · AU (AUv2) |
| Pro Tools | 12.8.4 or later |
| Sample rates | 44.1 / 48 / 88.2 / 96 / 192 kHz |
| iLok | Not needed. AXIS activates with your Kaizen Audio account; no iLok account, no iLok License Manager, no USB dongle |
| Internet | Required to activate the license (offline activation is available using a second, internet-connected computer; see 4.4) |
Windows is in development; this version is macOS-only.
3. Installation
3.1 Install
- Download the AXIS Upmixer installer from your Kaizen Audio account.
- Double-click the
.pkg. The installer is signed and notarized by Apple: you will see no macOS security warnings. - Follow the steps: Introduction → Read Me (release notes) → License (usage agreement) → Installation Type.
- On “Installation Type” you can untick any format you don’t need. By default all three are installed:
| Format | Installs to |
|---|---|
| Pro Tools AAX | /Library/Application Support/Avid/Audio/Plug-Ins/Kaizen Audio/AXIS Upmixer.aaxplugin |
| VST3 | /Library/Audio/Plug-Ins/VST3/Kaizen Audio/AXIS Upmixer.vst3 |
| Audio Unit | /Library/Audio/Plug-Ins/Components/AXIS Upmixer.component |
- Enter your administrator password when macOS asks for it and finish the installation.
3.2 After installing
- Restart your DAW so it picks up the plugin.
- Pro Tools: if it was open, quit it completely (Cmd+Q) and relaunch — it rescans plugins automatically.
- Logic: on first launch, macOS validates the Audio Unit automatically. AXIS appears under Audio FX → Kaizen Audio → AXIS Upmixer.
3.3 Updating
Install the new .pkg on top; no need to uninstall first. Your license, your presets and your settings are untouched. The plugin itself tells you when a new version is out (see 13. ABOUT tab).
3.4 Uninstalling
There is no uninstaller; it is done by hand. Delete the three bundles from the table above (the first two require an administrator password).
If you have other Kaizen Audio plugins installed, don’t delete the
Kaizen Audio/folders themselves — only the AXIS bundles. And remember: before retiring or wiping a computer, free its activation with Deactivate (4.5).
4. Licensing: trial, activation and deactivation
AXIS is licensed through your Kaizen Audio account. No iLok, no serial numbers to type: activation happens in your browser.
4.1 What happens the first time
When you insert AXIS without a license, the activation panel opens on its own over the plugin and cannot be closed until you activate. While the plugin is not activated it runs in demo mode: audio passes clean for 5 seconds, then goes silent for 3 seconds, in a continuous cycle. If you hear those periodic dropouts, nothing is broken — it just needs activating.
4.2 Activating (with internet)
- Click Activate your plugin, then Let’s go!.
- Your browser opens at kaizen.audio. Log in and, from the side menu of your user account, assign your license — or request the trial period if you haven’t purchased yet.
- Go back to your DAW. The panel closes by itself and the audio runs clean within 5 seconds, no restarts needed.
- Check the status on the ABOUT tab: you’ll see the green LICENSED pill and your email.
If the browser doesn’t confirm within 4-5 minutes, the panel shows Timed out, please try again! — just repeat the process.
4.3 The trial period
The trial is the full plugin, with no sound limitations, for 15 days. When it expires, AXIS returns to demo mode (3-second dropouts) and the activation panel reappears so you can enter a permanent license.
4.4 Offline activation (computer without internet)
If the studio machine is isolated from the network, on the Activation screen click the Offline Activation link:
- Step 1 — Generate Machine File: save your computer’s identifier file (
axis-upmixer_OfflineActivation.dt, Desktop by default). - Step 2: take that file (USB stick) to any computer with internet, go to kaizenaudio.moonbase.sh/activate, upload it and download your license file (
.mb). - Step 3: back in the studio, drag the license file onto the drop zone in the panel (or double-click the zone to browse for it).
Licenses activated offline never connect to the internet again.
4.5 Deactivating / moving to another computer
Your license covers up to 2 of your own computers (one license per person). To free up a machine:
ABOUT → Manage License → Deactivate (red button).
- Requires an internet connection (it tells the server that seat is now free).
- Deletes the local license; the plugin returns to its unactivated state.
- Important: always deactivate with the button — not by deleting files or wiping the drive. If you remove the local license without deactivating, that machine still counts as occupied. If that happens, contact support to release it.
- Offline-activated licenses have no Deactivate button: to move them, handle it through the website or support.
4.6 Day-to-day use and working offline
With an online license, AXIS revalidates with the server occasionally and silently. If your machine goes offline (or a proxy/VPN is blocking), the plugin keeps working normally for a 14-day grace period, showing the deadline on screen. Get back online at any point before that date and the counter resets itself.
4.7 One Mac, two activations (the Rosetta case)
If you use the plugin in a native Apple Silicon DAW and also in one running under Rosetta, each mode stores its own activation — it may ask you to activate twice on the same Mac. That’s normal.
5. Quick start
- Insert AXIS Upmixer on your stereo track, choosing the destination format: in Pro Tools, the plugin list offers every variant (Stereo → 5.1 … Stereo → 9.1.6) — pick, say, Stereo → 7.1.4. In other DAWs, the plugin adopts the track’s bus format.
- The plugin’s bottom bar confirms the active format:
Stereo → 7.1.4. - Activate if it’s the first time (section 4).
- Pick a mode with the 5 buttons under the radar. Not sure which? MODERN (the factory default).
- Hit play and watch the radar: the cloud of light shows you where everything is sounding in the room.
- Adjust the CONTROL tab knobs to taste — start with CENTER (how much dialog/vocal goes to the center speaker), SURROUND (how much room) and, if your format has height, HEIGHT AMB (how much air rises to the ceiling).
- Check the guarantee anytime: hold Ø. If you hear silence, your stereo downmix is intact.
The plugin’s latency is fixed (2560 samples) and reported to the DAW, which compensates automatically — nothing to set up.
6. The interface, zone by zone
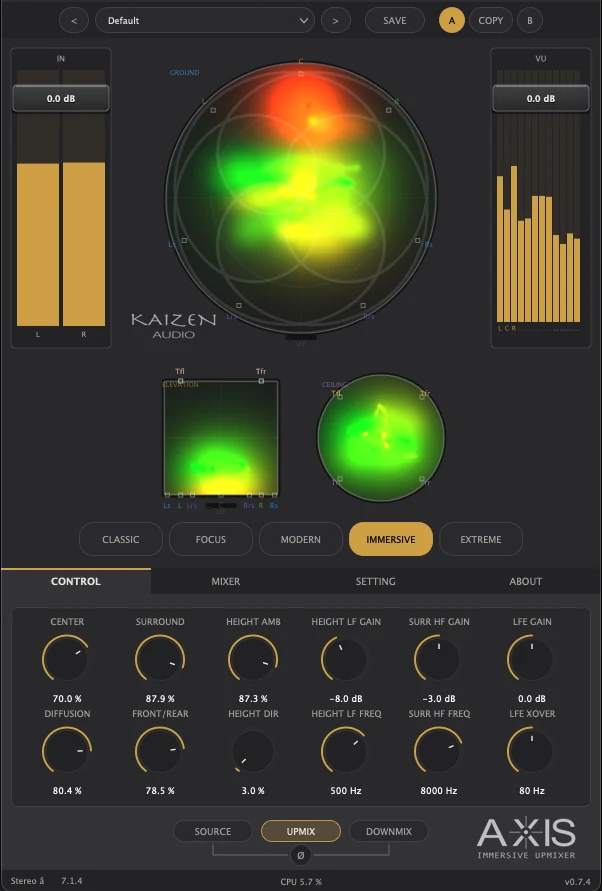
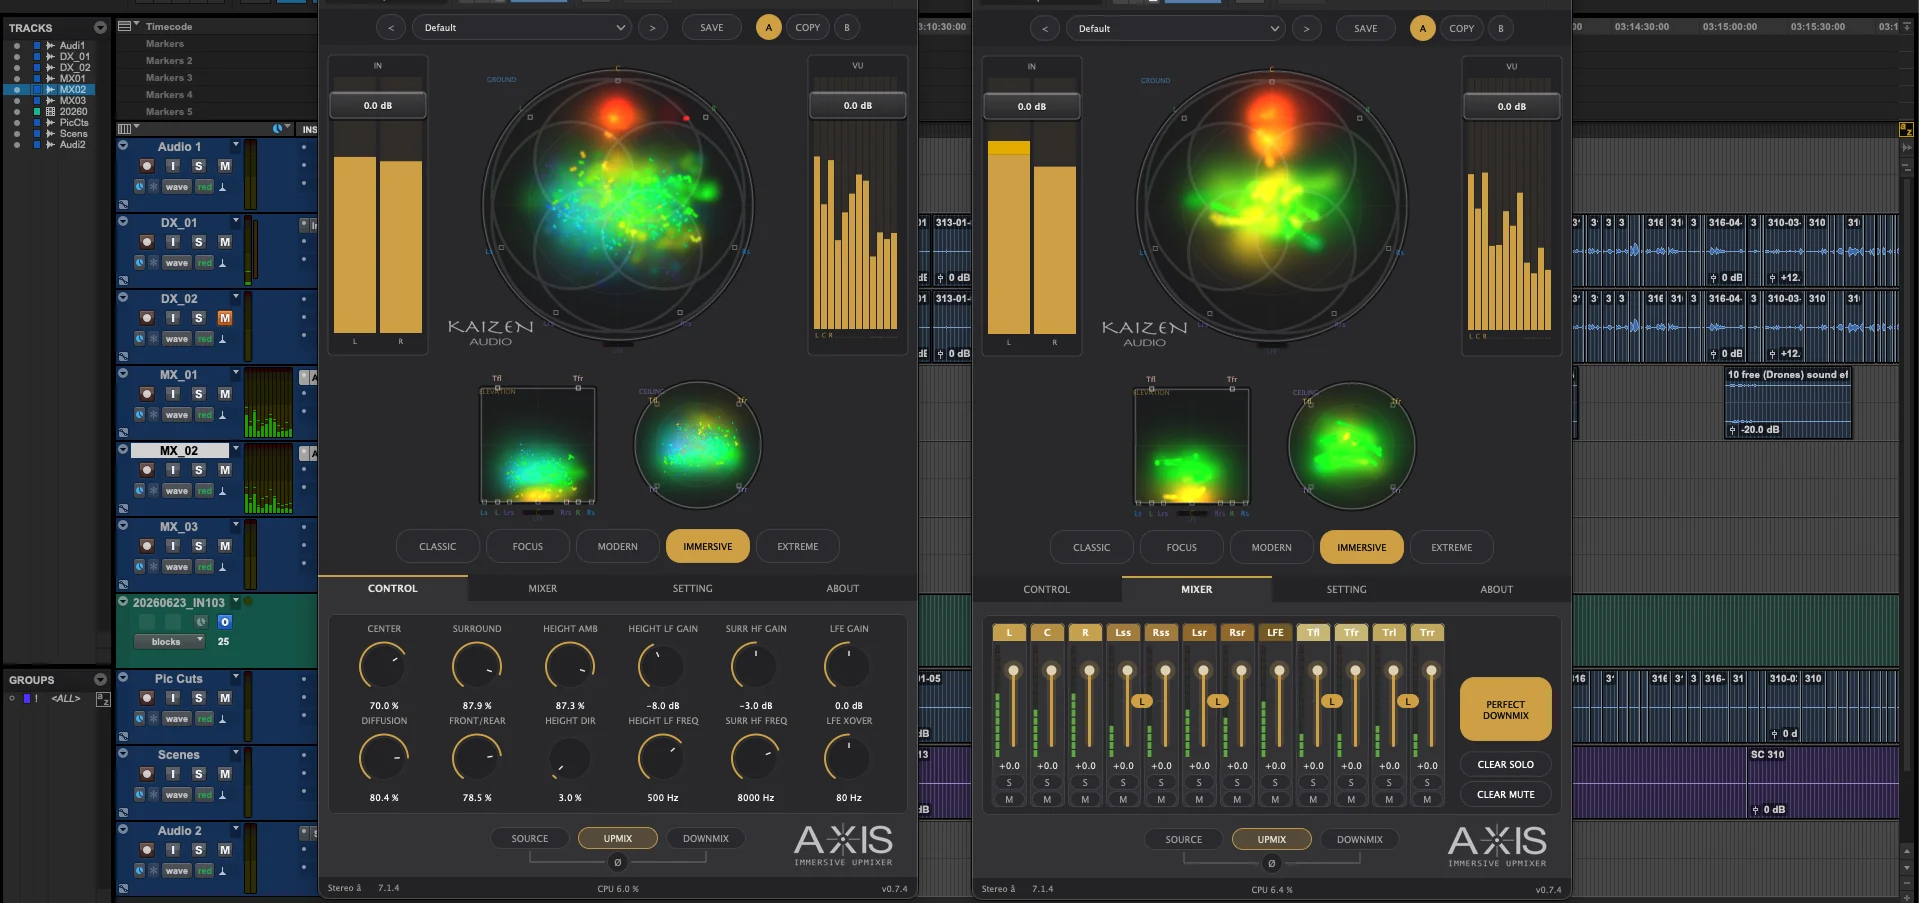
The window has a fixed size and grows vertically on its own when the format has ceiling channels (two extra radars and the height knobs appear).
Top to bottom:
| Zone | What’s there |
|---|---|
| Preset bar | < > to browse, preset menu, SAVE, and the A / COPY / B slots |
| IN (left) | L/R input meters. Drag vertically over them to set the input gain (−60…+12 dB) |
| Main radar | The top-down view of the room (labeled GROUND) |
| VU (right) | Meters for every output channel. Drag over them to set the output gain (−60…+12 dB) |
| Ceiling radars (height formats only) | ELEVATION (front view, floor/ceiling) and CEILING (top-down view of the ceiling) |
| ENGINE | The 5 mode buttons: CLASSIC · FOCUS · MODERN · IMMERSIVE · EXTREME |
| Tabs | CONTROL · MIXER · SETTING · ABOUT |
| Monitor | SOURCE · UPMIX · DOWNMIX + the Ø button |
| Status bar | Active format (Stereo → 7.1.4), CPU usage and version |
The three monitor buttons
They choose what you hear at the output (internal processing never stops):
- UPMIX — the full multichannel mix. The normal working mode (and the default).
- SOURCE — the original stereo, time-aligned, on L/R. One-click A/B against the source.
- DOWNMIX — the ITU stereo fold-down of your upmix, on L/R. What a stereo listener will hear.
Next to them, the Ø button (null test — see section 8).
Meters
The VU meters run from −60 dBFS (empty) to 0 dBFS (full): gold up to ≈ −18, amber up to ≈ −9 and red from there up. The column order is chosen in SETTING: FILM (Pro Tools visual order: L C R…, with the LFE after the bed — the factory setting) or SMPTE (bus channel order: L R C LFE…).
CEILING OBJ (Pro Tools only)
In the lower-right corner of the main radar, on 5.1 or 7.1 Pro Tools tracks, you’ll find the CEILING OBJ selector (OFF / .4 / .6) for the Atmos objects workflow. See section 15.
7. The 5 modes (engines)
The five buttons under the radar are five upmix philosophies, ordered from most conservative to most aggressive. They share the same analysis quality and the same latency; what changes is what they do with the material.
CLASSIC — the conservative one
The upmix that shows the least. Raw transient response, no phase tricks: the front leads and the room follows discreetly. Use it for: delicate material, broadcast, whenever the upmix should be as invisible as possible.
FOCUS — clarity first
Direct material (vocals, dialog, lead instruments) never leaves the front; only ambience travels to the surrounds and the ceiling. Even with DIFFUSION maxed out, FOCUS keeps diffusion restrained. Use it for: film/TV dialog, exposed vocals, any case where intelligibility and screen anchoring are non-negotiable.
MODERN — the balanced one (default)
The all-rounder: enveloping without losing focus, with smoothed analysis and fine low-mid panorama. Use it: by default. Music and film. When in doubt, MODERN.
IMMERSIVE — inside the room
Starts from MODERN and pushes more material into the surrounds and the ceiling, with about 3 dB of extra room that the Downmix Lock automatically gives back by subtracting it from the front — more envelopment, same guaranteed downmix. Use it for: immersive music, ambiences, content where the listener should be inside.
EXTREME — the creative one, no safety net
A sound-design tool: it can empty the front completely and send everything to the ceiling (HEIGHT DIR maxed) or move it all to the surrounds (SURROUND maxed). It is the only mode without the Downmix Lock — in exchange, it allows effects the guarantee would make impossible. Use it for: effects, creative passes, experimental music. Not for deliveries where the stereo fold-down must match the original.
In the four locked modes, lows (below ~200 Hz) stay anchored to the front, where they were mixed — so the stereo never loses body on fold-down. EXTREME skips that protection too.
8. The Downmix Lock and the Ø button
What it guarantees
In CLASSIC, FOCUS, MODERN and IMMERSIVE, the ITU-R BS.775 fold-down of the multichannel output reproduces the input stereo bit for bit: the residue sits more than 120 dB below the signal — silence for all practical purposes, far below anything audible or anything a studio meter will show.
Two honest footnotes:
- The LFE channel is not part of the downmix (zero coefficient, per the standard). That’s why you can adjust LFE GAIN freely without touching the guarantee.
- The L and R channels carry a compensation residue around −30/−40 dBFS. Inaudible in normal listening; only detectable soloing a channel with critical material during QC.
The Ø button: check it yourself
Hold down the Ø button (between SOURCE and DOWNMIX): you will hear the difference between the original stereo and your upmix folded down.
- Silence → the Lock is doing its job. Your downmix is the original master.
- Anything audible → you’re in EXTREME (no Lock), or you’ve broken the identity with the MIXER faders (see PERFECT DOWNMIX, section 11).
And don’t worry: the button is a simple quick check — it is momentary by design (release it and the mix comes back), not automatable, and never saved with the session or presets. It cannot possibly be left engaged in a mix by accident. While it is held, the input/output trims are bypassed so the subtraction is a true one.
9. Upmix controls (CONTROL tab)
Formats without ceiling channels show 8 knobs; with ceiling, 12 (the four HEIGHT knobs join in).
The two filters, at a glance. This is what raises the most questions the first time — two filters, and which touches what?
- SURR HF (FREQ + GAIN) works on the surrounds only and trims their highs: think of it as a gentle low-pass for the room — darker and more natural, with the front untouched.
- HEIGHT LF (FREQ + GAIN) works on the ceiling only and trims its lows: think of it as a gentle high-pass for the height — the weight stays down below, the ceiling carries the air.
Mnemonic: everything starting with HEIGHT is ceiling; SURR is the room.
Image and room
| Knob | Range (default) | What it does |
|---|---|---|
| CENTER | 0–100 % (70 %) | The center-channel axis. At 0 %, the voice stays as a phantom center between L and R (the center speaker stays silent); at 100 %, maximum anchoring to the physical C speaker. The factory 70 % is the typical post setting: dialog firmly on screen. |
| SURROUND | 0–100 % (60 %) | How much ambience goes to the surrounds. More = more room. |
| DIFFUSION | 0–100 % (50 %) | The character of that room: low = defined, locatable echoes; high = a smooth, homogeneous blanket. |
| FRONT/REAR | 0–100 % (50 %) | Tilts the field toward the screen (low) or the back of the room (high). 50 % = neutral. Does not affect the LFE (if rebalancing leaves you missing punch, reach for LFE GAIN). |
Height (ceiling formats only)
| Knob | Range (default) | What it does |
|---|---|---|
| HEIGHT AMB | 0–100 % (60 %) | How much of the ambient part (air, reverb tails) rises to the ceiling. The safe way to fill the height: it barely touches the front. |
| HEIGHT DIR | 0–100 % (15 %) | How much of the direct part (vocals, leads) rises to the ceiling. The Lock compensates by lowering the front accordingly: it feels like the mix “climbs”. Use in moderation. |
| HEIGHT LF FREQ | 100–1000 Hz (500 Hz) | Corner frequency of the ceiling’s low filter. |
| HEIGHT LF GAIN | −18…+6 dB (−8 dB) | How much low end you let rise to the ceiling. The factory value keeps the weight down where it works; at 0 dB the ceiling rises full-range. |
Room tone
| Knob | Range (default) | What it does |
|---|---|---|
| SURR HF FREQ | 1–16 kHz (8 kHz) | Corner frequency of the surrounds’ high filter. |
| SURR HF GAIN | −12…+6 dB (−3 dB) | Darkens (or opens) the room’s highs progressively: the further back the channel, the stronger the effect; the front stays untouched. The factory −3 dB mimics a room’s natural absorption and “pushes” the mix toward the screen. |
Lows and LFE
| Knob | Range (default) | What it does |
|---|---|---|
| LFE XOVER | 40–200 Hz (80 Hz) | Up to which frequency the LFE channel is fed. |
| LFE GAIN | −12…+12 dB (0 dB) | LFE level. It is a parallel branch: it subtracts nothing from L/R and does not enter the downmix — set it freely, the Lock doesn’t flinch. |
The 5.0 and 7.0 outputs have no sub channel: LFE XOVER and LFE GAIN show up dimmed and locked. No bass content is lost — the LFE is a parallel branch and the low end always lives in L/R.
Input and output trims
Drag vertically on the meters themselves — IN (left) and VU (right): −60…+12 dB, 0 dB by default. The input trim acts before processing; the output trim after (across all channels).
10. The radar (visualizer)
The radar is AXIS’s visual signature: a cloud of light showing, in real time, where every frequency of your mix is sounding in the room. It is not decoration — it is an analyzer: it shows exactly the signal leaving the plugin, after all processing. What you see is what you hear.
10.1 The three views
| Radar | Label | What it is |
|---|---|---|
| Main (large) | GROUND | The room seen from above: the bed (floor channels). Front at the top, back at the bottom. |
| Lower left | ELEVATION | The room seen from the front, as if sitting in the sweet spot: ceiling above the horizon line, floor below. |
| Lower right | CEILING | The ceiling only, seen from above. |
The two ceiling radars only appear when the active format has height channels.
10.2 How to read the cloud
Every particle of light is a frequency band of your mix, placed where it sounds:
- Angle = direction in the room. Up is the front (screen), down is the back, left and right are literal.
- Distance from center = concentration. A particle hugging the edge is sounding from a single speaker (it lands right on its marker); a particle near the center is spread between opposite speakers — a diffuse, enveloping field. The classic “central cloud” is precisely the ambience surrounding you.
- Brightness and density = level. The louder and the more content, the more light.
- Trail = recent history: the wake shows you where the energy has been moving.
Typical readings:
- A centered vocal → a bright, compact blob on the C marker.
- Enveloping reverb → a wide, faint cloud around the center.
- A pan → a star crossing the radar leaving a trail.
- A mix with a loaded front and an empty room → all the light up top; raise SURROUND and watch the cloud stretch downward.
The small squares around the perimeter are the speakers of the active format, each with its label (L, C, R, Ls, Rs… and the ceiling ones on the upper radars). They pulse with their channel’s level: one glance tells you which speakers are hot. Each family has its label color (fronts in green, center in orange, surrounds in blues/purple, ceiling in yellows/violet).
The LFE has its own indicator: the magenta horizontal bar under the circle (a channel with no direction can’t live inside a radar). It grows and lights up with the sub level.
The radar is not a level meter. It has automatic visual gain: it reads the same on a −30 LUFS ambience and a −12 LUFS master. For absolute levels, use the VU meters.
Note: the radar always shows the internal upmix, even while you monitor DOWNMIX or hold Ø — so you keep seeing the field you are creating while listening to the fold-down. In those two modes, the markers and the LFE bar stay at rest.
10.3 The colors (VISUALIZER COLORS, in SETTING)
- FREQ (default) — color tells frequency: red = sub lows, orange/yellow = lows and low mids, green = mids, cyan/blue = presence, violet = air. A “spatial spectrogram”: you instantly see where each range lives in the room.
- LAYER — two colors: green = floor, violet = ceiling. On the ELEVATION radar it shines: a sound rising to the ceiling literally crosses from green to violet. The mode for judging how much you’re sending up.
- 3BAND — a three-band traffic light with no in-betweens: red < 200 Hz, yellow 200 Hz–2 kHz, green > 2 kHz. Instant read of “is this dark or bright?“.
10.4 The drawing styles (VISUALIZER MODE, in SETTING)
- Drops (default) — the full dust cloud: thousands of fine particles, one per band. The analytical view: what’s there and where.
- Tray — only the ~40 strongest bands, drawn as comets with trails. The motion view: what’s moving and where to. Trail length is set with the TRAY slider.
Each style remembers its own set of the 8 SETTING sliders: switch between them and each recalls its own.
11. MIXER tab
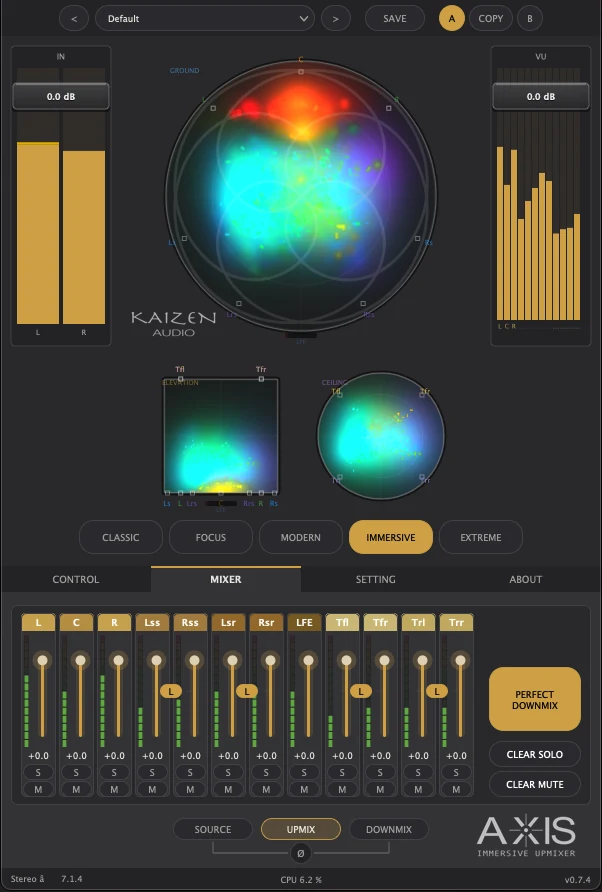
One channel per column (same order as the VU meters), each with: mini-meter, fader (−60…+12 dB), dB readout, and S (solo) and M (mute) buttons. Bottom right, CLEAR SOLO and CLEAR MUTE clear them all at once.
LINK: stereo pairs (L/R, surrounds, ceilings…) come linked from the factory — move one fader and its partner follows. The little L button between each pair unlinks them.
PERFECT DOWNMIX
The big button on the right is the Downmix Lock’s guardian inside the MIXER:
- On (factory): the faders are bypassed and the stereo fold-down remains bit-exact.
- The moment you move a fader, it switches itself off and starts flashing red: DOWNMIX BROKEN — BYPASS MIXER. Translation: you’ve traded the guarantee for manual level control. Everything still plays; the downmix is simply no longer identical to the original (the Ø button will stop giving silence).
- It re-arms itself when you return every fader to 0 dB and clear solos and mutes — or press it to jump straight back to the guaranteed state.
Use it deliberately: for stems and delivery tweaks the MIXER is a joy; for the delivery with the downmix guarantee, keep it lit.
12. SETTING tab
Everything on this tab is a preference of your machine, not of the project: it doesn’t travel in presets or sessions, doesn’t show up in DAW automation, and follows you from one session to the next.
Meter order
SMPTE | FILM — the column order of the VU meters and the MIXER (section 6). Factory: FILM.
RESET WARNINGS
Brings back any notices dismissed with “Don’t show this again” (like the CEILING OBJ workflow notice).
The 8 visualizer sliders
| Slider | Default | What it does |
|---|---|---|
| DECAY | 50 % | Trail persistence: from a very dry response (0) to trails a couple of seconds long (100). |
| DENSITY | 50 % | The cloud’s luminous load: from faint and airy to thick and bright. |
| SPEED | 30 % | Despite the name, it changes no speed: it controls the size and softness of each dot — low = fine, defined grain; high = soft, nebulous specks. |
| THRESH | −80 dB | Sensitivity: at −30 only the loud stuff draws (clean, selective radar); at −100 everything shows, down to the room tone. |
| BLUR | 20 % | Defocus: 0 = crisp dust; high = an ethereal nebula. |
| WHITE | 30 % | Rescues color when many particles pile up and the cloud “goes white”: raise it and neutral pixels fade out, pure colors survive. |
| TINT | 50 % | Saturation: pushes weak tints toward the pure color. |
| TRAY | 5 | Trail length in Tray mode (no effect in Drops). |
Plus the two combos covered above: VISUALIZER MODE (Drops/Tray) and VISUALIZER COLORS (FREQ/LAYER/3BAND).
13. ABOUT tab
- Installed version.
- License status: green LICENSED pill (activated — with a license or an active trial) or amber TRIAL (not activated), plus your account email.
- Manage License — opens the license panel: view your activation details (type, email, ID) and Deactivate to free the machine (section 4.5).
- Update notice: when a new version is out, a link appears here — Update to vX available — and, when you open the plugin, a small card in the lower-right corner with Update Now (it takes you to the download in your browser; nothing installs itself). Do not show again silences it for that version only.
14. Presets and A/B comparison
The top bar drives the presets:
</>— previous / next preset.- Center menu — every preset: factory first, then your folders and your presets.
- SAVE — save with a name and folder (you can create folders right from the dialog with New folder…). If the name exists, it asks before overwriting.
A preset stores the complete mix: the knobs, the mode (engine), the trims, the MIXER state, the monitor mode and CEILING OBJ. It does not store machine preferences (visualizer, meter order) — share presets with anyone without dragging your visual setup along, and load theirs without it changing yours.
Your presets live in ~/Documents/Kaizen Audio/AXIS Upmixer Presets/ (.axispreset files); subfolders become the menu’s folders. Copy them, back them up or move them between machines like regular files.
From v0.7.11 every Kaizen Audio program keeps its files under the same master folder,
Documents/Kaizen Audio/, one folder per program (AXIS Upmixer Presets,Prism Monitor Layouts,Prism Analyzer Plugin Layouts…). Coming from an older version, your presets move themselves the first time you open the plugin: one by one, dates intact, never overwriting anything already there, and the old folder (Documents/AXIS Upmixer/) is removed only if it ends up empty. Nothing for you to do.
A / COPY / B
Two full memories for comparing settings:
- A and B — switch between the two memories (the current state is kept in the one you leave).
- COPY — copies the current state to the other memory and jumps to it: the perfect starting point for “same, but with this one knob different”.
15. Ceiling objects in Pro Tools (CEILING OBJ)
This is a special workflow, exclusive to Pro Tools. The classic formats with the ceiling built into the bus (5.1.2 · 7.1.2 · 5.1.4 · 7.1.4 · 9.1.6…) still exist in Pro Tools too and work as always — if you’d rather keep it simple, use those and leave CEILING OBJ on OFF.
Why this mode exists
In a Pro Tools Dolby Atmos session, the bed is capped by Dolby at 7.1.2: a single pair of ceiling speakers. If you want a ceiling with more definition — .4 or .6, that is four or six height channels — those extra channels don’t fit in the bed: they have to reach the Renderer as objects.
CEILING OBJ exists exactly for that: AXIS generates the ceiling through dedicated auxiliary outputs, ready to feed object tracks — and you go past the .2 limit with all the ceiling resolution you want.
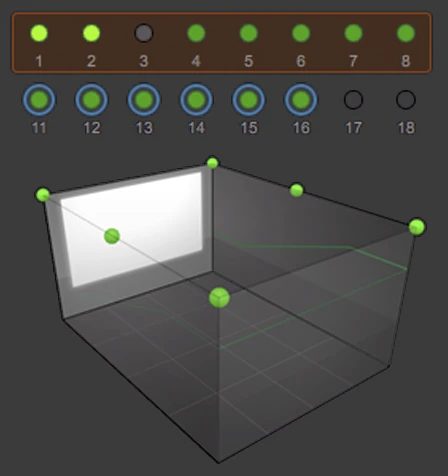
The options
On 5.1 or 7.1 tracks, next to the radar you’ll find CEILING OBJ:
- OFF (factory) — no ceiling through auxiliaries. Everything goes through the main bus.
- .4 — AXIS works internally in 5.1.4/7.1.4 and outputs the ceiling through 2 stereo stems: Top Front and Top Rear.
- .6 — from 7.1 only: a full 6-channel ceiling through 3 stems: Top Front, Top Side and Top Rear.
When you engage it, the label lights up amber as a persistent reminder, and the first time the plugin shows you the routing guide (recoverable with RESET WARNINGS if you dismissed it).
Setting it up in Pro Tools (summary)
- A 7.1 track with your stereo + AXIS (
CEILING OBJ = .6). That track is your bed. - Create 3 stereo Aux Inputs and switch them to objects: Track → Object → On.
- Input of each one: plug-in → AXIS Upmixer → Top Front / Top Side / Top Rear.
- In each object’s Atmos panner: raise it to the ceiling (Z = 1.0), width at 100 %, and place it front (Top Front, Y=0.0), middle (Top Side, Y=0.5) or rear (Top Rear, Y=1.0). In Pro Tools 2023+ there’s a shortcut: right-click → Snap to Speaker.
Important:
- If you engage
.4/.6and don’t route the auxiliaries, the ceiling plays nowhere — that’s what the warning is about. - The stems only carry signal while monitoring UPMIX (in SOURCE/DOWNMIX they are silent, on purpose).
- The Downmix Lock holds across the sum of bed + objects: when the Renderer folds everything down, the guarantee stands.
- You will see AXIS’s stems in the Pro Tools input selector even in configurations where they don’t apply (e.g. Top Side in
.4mode, or on tracks whose bed already carries the ceiling): in those cases they are simply silent. It’s a limitation of the AAX format, not a routing mistake on your side.
16. DAW notes and known limitations
Pro Tools
- Native AAX, Pro Tools 12.8.4+. CEILING OBJ workflow available (Ultimate/Studio for Atmos objects).
- After installing or updating: Cmd+Q and relaunch (Pro Tools caches its plugin list between launches).
Logic
- Via Audio Unit. Insert AXIS on a stereo track and choose the required channel-changing Audio Unit variant (for example,
Stereo → 5.1.4). No auxiliary stems: work with the native bed, where the ceiling is included in.2/.4/.6formats.
Nuendo / Cubase / Studio One
- Via VST3. In Nuendo and Cubase, create the destination surround track, place the stereo material on channels 1/2 and insert AXIS on that track. Available formats depend on the DAW.
Reaper
- From v0.7.13, AXIS follows the track’s channel count (5 … 16). Before that it always stayed at 5.1: Reaper hands its buses over without naming the speakers, and the plugin wouldn’t accept them.
- Three widths are ambiguous and you decide: 8 channels can be 7.1 or 5.1.2; 10 can be 5.1.4 or 7.1.2; 14 can be 9.1.4 or 7.1.6. The channel count alone doesn’t say which, and Reaper gives no further clue. That’s what the OUT FORMAT combo is for (see below). At 12 and 16 channels there’s no doubt: they’re 7.1.4 and 9.1.6.
OUT FORMAT — the safety selector (VST3 and AU)
In VST3 and AU you’ll see an OUT FORMAT combo to the right of the radar, below it. It isn’t there in Pro Tools: that spot holds CEILING OBJ, which is a Pro Tools-only workflow.
- It appears only when the current channel count fits more than one speaker layout: 8 channels (
7.1/5.1.2), 10 (5.1.4/7.1.2) or 14 (9.1.4/7.1.6). When the format is unambiguous, there is nothing to choose and the control disappears. - The menu contains only the two layouts that fit the current bus. The highlighted entry is the format AXIS is using right now — there is no separate
AUTOitem. - If the DAW reports the wrong layout, pick the other one. To return to following the host, select the layout the host reports. The choice is saved with the session.
Bottom left, the plugin always tells you what it’s doing: Stereo → 7.1.4.
Ableton Live
- Via VST3, in whatever stereo/multichannel configurations your Live version allows.
17. Troubleshooting
The audio cuts out for 3 seconds every few seconds. That’s demo mode: the plugin isn’t activated (or the trial expired). ABOUT tab → activate your license. Section 4.
AXIS doesn’t show up in Logic. Make sure the latest version is installed and restart your Mac (forces the Audio Unit rescan).
Pro Tools doesn’t show the plugin (or shows odd configurations) after updating.
Quit Pro Tools completely (Cmd+Q) and relaunch. Last resort: delete ~/Library/Preferences/Avid/Pro Tools/InstalledAAXPlugIns and let it rescan.
Only 6 channels in Reaper. Fixed in v0.7.13 — update. If it persists, check that Reaper has rescanned its plugins (Preferences → Plug-ins → Re-scan) and that the track really has the channel count you want (section 16).
In Reaper the track has 8, 10 or 14 channels and AXIS picks the format I didn’t want. Those three widths fit two different formats each, and Reaper doesn’t say which. Use the OUT FORMAT combo that appears in the plugin to choose (section 16).
I engaged CEILING OBJ and the ceiling is silent. The stems must be routed to object tracks (section 15). Also check you’re monitoring UPMIX.
The Ø button doesn’t give silence. EXTREME mode? (no Lock there). PERFECT DOWNMIX off/flashing? (MIXER faders break the identity — re-arm the button). In the other four modes with PERFECT DOWNMIX on, Ø = silence, always.
“Online validation failed” on screen. The plugin can’t reach the server (offline? VPN? proxy?). You have a 14-day grace period with the deadline shown; get back online before that date. Section 4.6.
I want to move my license to another Mac. ABOUT → Manage License → Deactivate on the old machine; activate on the new one. Section 4.5.
The radar runs smooth but knobs/meters stutter in huge sessions. The radar runs on the GPU with its own thread; the rest of the interface depends on the DAW’s UI thread, which can choke in very heavy sessions. Audio is unaffected. Closing the editors of instances you’re not adjusting also saves CPU.
Support: hello@kaizen.audio — write from your account email and include plugin version, DAW and OS. Error messages in the license panel can be selected and copied directly.
18. Specifications
| Input | Stereo |
| Outputs | 5.0 · 5.1 · 7.0 · 7.1 · 5.1.2 · 5.1.4 · 7.1.2 · 7.1.4 · 7.1.6 · 9.1.4 · 9.1.6 |
| Downmix Lock | Bit-exact ITU-R BS.775 fold-down in CLASSIC/FOCUS/MODERN/IMMERSIVE (residue more than 120 dB below the signal, verified); EXTREME exempt by design |
| Latency | 2560 samples, fixed — 58.1 ms @ 44.1 kHz · 53.3 ms @ 48 kHz · 26.7 ms @ 96 kHz · 13.3 ms @ 192 kHz. Compensated by the DAW (PDC) |
| Sample rates | 44.1 – 192 kHz |
| Auxiliary stems (AAX) | Top Front · Top Side · Top Rear (stereo each), for the Atmos objects workflow |
| Automation | Every mix control; display preferences are deliberately excluded |
| CPU (indicative) | ~5 % for one 7.1.4 instance in Pro Tools (Apple Silicon); offline bounces run far faster than real time. With the editor closed, the plugin skips all visualization cost |
| Formats | AAX · VST3 · AU — macOS 12+, universal (Apple Silicon + Intel), signed and notarized |
AXIS Upmixer is a product of Kaizen Audio Group SL — kaizen.audio Dolby and Dolby Atmos are trademarks of Dolby Laboratories. Pro Tools and AAX are trademarks of Avid Technology. All trademarks are the property of their respective owners.