
Latest update
What’s new in v0.6.42
- The activation window now always appears when Relay loads without an active licence.
- Once unlocked, Relay stays unlocked for the whole session, and licence checks no longer sit in the plug-in insertion path.
- Activation takes effect immediately after you return from the licence window.
Relay Talkback — User Manual
Manual version v0.6.42 · August 2026 · Kaizen Audio
Contents
- Introduction
- System requirements
- Installation
- Licensing: trial, activation and deactivation
- Quick start
- The interface, zone by zone
- The transport-driven gate
- The ON AIR button
- Remote control: MIDI and keyboard
- The Rescue Recorder
- DAW notes
- Troubleshooting
- Specifications
1. Introduction
Relay Talkback is the talkback that runs itself. Insert it on your DAW’s talkback mic channel and it reads the host transport, opening and closing the mic automatically: you stop, and you can talk to the room; you hit record, and the mic mutes itself. No forgotten footswitches, no voices leaking into a take, no clicks in the room’s monitors.
It is built for recording and post-production studios: dubbing, ADR, foley, voice-over, music sessions — any workflow where the engineer talks to someone on the other side of the glass a hundred times a day.
Two ideas define the plugin:
The transport gate
The state of the host transport is the talkback switch. Out of the box, Relay runs the classic flow: transport stopped = mic open; playing or recording = mic closed. Every change is applied with smooth, click-free ramps, and you can always step in manually — by holding the big button, from a MIDI controller or with a keyboard shortcut (section 8 and 9).
The Rescue Recorder
The best moments of many sessions happen while you are not recording: the perfect rehearsal, the director’s note, that read the actor nailed before you hit REC. Relay ships with a built-in rescue recorder: feed its sidechain input with the room’s signal and, while the transport is stopped, those moments are captured to disk as WAV files, all by themselves (section 10).
Relay’s two signals, at a glance. This is the one thing worth getting clear from the start:
- The main input is your voice into the room: the talkback mic. It is the signal the gate opens and closes, and the one shown by the level ring around the ON AIR button.
- The sidechain is the ear that never stops listening to the room: whatever signal you want rescued (the booth mic, your record bus). It does not sound through the plugin — it feeds the rescue recorder and its dot meter, nothing else.
The talkback and the recorder are independent: use either one, or both.
What goes in, what comes out
- Input: mono (the talkback mic) + a mono sidechain input (the signal for the Rescue Recorder).
- Output: mono. Relay is inserted on mono channels — your talkback Aux or track.
- Plugin formats: AAX (Pro Tools), VST3, AU (Logic) — macOS only for now.
2. System requirements
| Operating system | macOS 12 (Monterey) or later |
| Processor | Apple Silicon or Intel (native universal binary) |
| Formats | AAX · VST3 · AU (AUv2) |
| Pro Tools | 12.8.4 or later |
| Sample rates | 44.1 / 48 / 88.2 / 96 / 192 kHz |
| iLok | Not needed. Relay activates with your Kaizen Audio account; no iLok account, no iLok License Manager, no USB dongle |
| Internet | Required to activate the license (offline activation is available using a second, internet-connected computer; see 4.4) |
Windows is in development; this version is macOS-only.
3. Installation
3.1 Install
- Download the Relay Talkback installer from your Kaizen Audio account.
- Double-click the
.pkg. The installer is signed and notarized by Apple: you will see no macOS security warnings. - Follow the steps: Introduction → Read Me (release notes) → License (usage agreement) → Installation Type.
- On “Installation Type” you can untick any format you don’t need. By default all three are installed:
| Format | Installs to |
|---|---|
| Pro Tools AAX | /Library/Application Support/Avid/Audio/Plug-Ins/Kaizen Audio/Relay Talkback.aaxplugin |
| VST3 | /Library/Audio/Plug-Ins/VST3/Kaizen Audio/Relay Talkback.vst3 |
| Audio Unit | /Library/Audio/Plug-Ins/Components/Relay Talkback.component |
- Enter your administrator password when macOS asks for it and finish the installation.
3.2 After installing
- Restart your DAW so it picks up the plugin.
- Pro Tools: if it was open, quit it completely (Cmd+Q) and relaunch — it rescans plugins automatically.
- Logic: on first launch, macOS validates the Audio Unit automatically. Relay appears under Audio FX → Kaizen Audio → Relay Talkback (on mono channels).
3.3 Updating
Install the new .pkg on top; no need to uninstall first. Your license and your settings are untouched.
The plugin itself tells you when a new version is out: an Update Available card appears over the window with an Update Now button (it takes you to the download in your browser; nothing installs itself). Do not show again silences it for that version only.
3.4 Uninstalling
There is no uninstaller; it is done by hand. Delete the three bundles from the table above (they require an administrator password).
If you have other Kaizen Audio plugins installed, don’t delete the
Kaizen Audio/folders themselves — only the Relay bundles. And remember: before retiring or wiping a computer, free its activation with Deactivate (4.5).
4. Licensing: trial, activation and deactivation
Relay is licensed through your Kaizen Audio account. No iLok, no serial numbers to type: activation happens in your browser.
4.1 What happens the first time
When you insert Relay without a license, the activation panel opens on its own over the plugin within a few seconds and cannot be closed until you activate. While the plugin is not activated it stays completely silent: no audio passes, the meters sit at zero and the rescue recorder won’t arm. If you insert Relay and it “does nothing”, nothing is broken — it just needs activating.
4.2 Activating (with internet)
- Click Activate your plugin, then Let’s go!.
- Your browser opens at kaizen.audio. Log in and, from the side menu of your user account, assign your license — or request the trial period if you haven’t purchased yet.
- Go back to your DAW. The plugin unlocks instantly, no restarts needed. The License button in the top bar turns from red to neutral.
- You can check the status anytime by clicking License: you’ll see the license type, your email and your activation ID.
If the browser doesn’t confirm within 4-5 minutes, the panel shows Timed out, please try again! — just repeat the process.
4.3 The trial period
The trial is the full plugin, with no limitations, for 7 days — talkback and Rescue Recorder included. You request it from the same account page during activation. When it expires, Relay returns to silence and the activation panel reappears so you can enter a permanent license.
4.4 Offline activation (computer without internet)
If the studio machine is isolated from the network, on the Activation screen click the Offline Activation link:
- Step 1 — Generate Machine File: save your computer’s identifier file (
relay-talkback_OfflineActivation.dt, Desktop by default). - Step 2: take that file (USB stick) to any computer with internet, go to www.kaizen.audio/?mb_intent=activate_product (the link is clickable right in the panel), follow the instructions and download your license file (
.mb). Click Next in the plugin. - Step 3: back in the studio, drag the license file onto the drop zone in the panel (or double-click the zone to browse for it).
Licenses activated offline never connect to the internet again.
4.5 Deactivating / moving to another computer
Your license covers up to 2 of your own computers (one license per person). To free up a machine:
License → Deactivate (red button, on your license status screen).
- Requires an internet connection (it tells the server that seat is now free).
- Deletes the local license; the plugin returns to its unactivated state.
- Important: always deactivate with the button — not by deleting files or wiping the drive. If you remove the local license without deactivating, that machine still counts as occupied. If that happens, contact support to release it.
- Offline-activated licenses have no Deactivate button: to move them, handle it through the website or support.
4.6 Day-to-day use and working offline
With an online license, Relay revalidates with the server occasionally and silently. If your machine goes offline (or a proxy/VPN is blocking), the plugin keeps working normally for a 14-day grace period, showing the deadline on screen. Get back online at any point before that date and the counter resets itself.
And one guarantee built for the studio: Relay never locks up mid-session. If the server invalidates a license while your DAW is open, you’ll see the notice on screen but the audio keeps running — any lock-out applies on the next launch, never while you work.
4.7 One Mac, two activations (the Rosetta case)
If you use the plugin in a native Apple Silicon DAW and also in one running under Rosetta, each mode stores its own activation — it may ask you to activate twice on the same Mac. That’s normal.
5. Quick start
- Insert Relay Talkback on your talkback mic channel — the mono track or Aux carrying your voice into the room’s cue mix.
- Activate if it’s the first time (section 4).
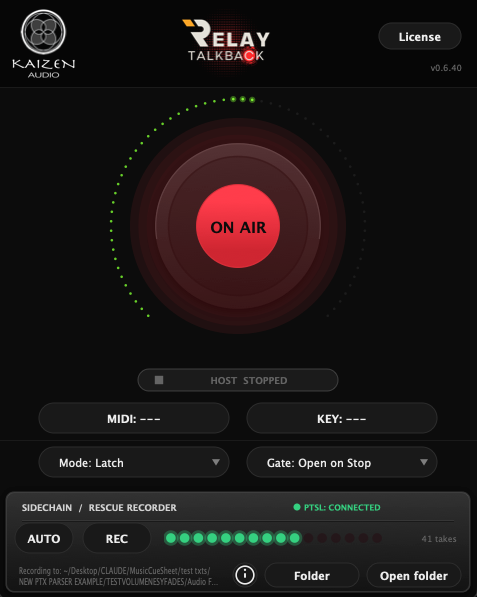
- It is already working: with the transport stopped, the big button reads ON AIR and the room hears you; hit Play or Rec and watch it drop to MUTED — the mic closed itself. The center pill always tells you what the plugin is seeing:
HOST STOPPED,HOST PLAYINGorHOST RECORDING. - Prefer the opposite flow (talking during playback)? Switch Gate: Open on Stop to Gate: Open on Playback (section 7).
- To step in against the current rule at any moment, hold the big button (Push to Talk from the factory) — or assign a MIDI pedal or a key (section 9).
- Rescue Recorder (optional but highly recommended): route the signal you record in your DAW (the booth mic, your record bus) into the plugin’s sidechain — in Pro Tools that’s the Key Input (the key menu) — and switch AUTO on. From then on, every time you stop the transport, that signal records itself to disk; hit Play and the file closes. Everything said between takes is rescued (section 10).
- Two meters, two signals: the ring around the button is your talkback mic (always moving, even while MUTED — your permanent mic check); the dots in the bottom strip are what’s entering the sidechain (what the recorder would capture).
6. The interface, zone by zone
The window has a fixed size. Top to bottom:
| Zone | What’s there |
|---|---|
| Top bar | Kaizen mark (left), Relay logo (center), License button with the version underneath (right) |
| ON AIR button | The heart of the plugin: a giant button with your mic’s level ring around it (section 8) |
| Transport pill | HOST STOPPED (grey) · HOST PLAYING (green) · HOST RECORDING (red) — what the plugin is seeing from the host |
| Trigger row | MIDI: --- and KEY: --- — remote trigger assignment (section 9) |
| Settings row | Mode: Push to Talk / Latch and Gate: Open on Playback / Open on Stop |
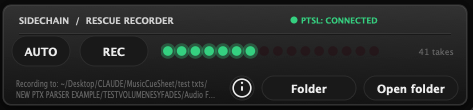
| SIDECHAIN / RESCUE RECORDER | The recorder strip: AUTO, REC, the sidechain dot meter, the take counter, the Recording to: line, the (i) info button, Folder and Open folder, and the PTSL status chip (section 10) |
The License button
Top right. Red while the plugin is not activated (or the license is not yet confirmed); neutral when everything is in order. Click it to open the license panel: activate, view your status (type, email, ID) or deactivate (section 4).
The transport pill
This is “what Relay is seeing”. If the gate isn’t doing what you expect, look here first: the pill reflects the transport state the plugin receives from the host, and the gate obeys exactly that. Playback and recording show in different colors, but the gate treats them the same (both are “transport running”).
7. The transport-driven gate
The Gate selector sets the talkback rule. Two modes:
Gate: Open on Stop (factory)
The classic talkback flow:
| Transport | Mic |
|---|---|
| Stopped | Open — you talk to the room |
| Playing | Closed |
| Recording | Closed |
You stop, comment on the take, give directions. You hit Rec and the mic vanishes from the talent’s headphones — hands free, no risk of your voice printing on the take.
Gate: Open on Playback
The inverted rule:
| Transport | Mic |
|---|---|
| Stopped | Closed |
| Playing | Open |
| Recording | Open |
For workflows where directions happen during playback — calling entrances over a guide track, directing a rehearsal with material rolling — and silence comes when you stop.
Smooth by design
Every open and close is applied with a cosine-curve ramp: 30 ms opening, 20 ms closing. Never a click, never a pop in the monitors or the talent’s headphones, no matter how fast you chain Play/Stop. The ON AIR button “breathes” during the ramp: you’ll see the color glide between MUTED and ON AIR.
When the session loads, Relay assumes the transport is stopped and starts in the correct state for the chosen mode — right from the first second, without waiting for the first Play.
8. The ON AIR button
The giant button is indicator, meter and control at once:
- Indicator: lit red with “ON AIR” when the mic is open; dark with “MUTED” when it is closed. The halo around it grows as the gate opens — one glance, even from across the room, tells you whether the talent can hear you.
- Meter: the 64-dot ring around it shows the level of your talkback mic (the plugin’s input), from −60 dB to 0 dB. It works at all times, including while MUTED: it is your permanent mic check — if you speak and the ring moves, the mic is reaching the plugin; whether it sounds in the room is the gate’s decision.
- Control: the center disc is clickable, and fires the manual override. Its behavior follows the Mode selector:
- Mode: Push to Talk (factory) — hold to invert the gate; release and the automatic rule returns. The natural gesture of a console talkback key.
- Mode: Latch — one click inverts, another undoes it. For long conversations without a finger on the button.
The trigger inverts, at a glance. The button (and MIDI, and the key) doesn’t “open” the mic: it inverts whatever the transport rule dictates at that moment. If the mic was closed, it opens; if it was open, it closes. Examples with the factory mode (Open on Stop):
- Recording (mic closed) + hold → you talk over the take. Release → closed again.
- Stopped (mic open) + hold → you mute yourself for as long as you hold: the talkback’s “cough key”.
In Latch, the inversion stays armed until you remove it — including across transport changes. If you latch yourself silent while stopped and then hit Play, the mic opens (the inversion is still applied, now to the new rule). The button always tells you the truth — ON AIR means ON AIR — but if the gate ever seems to “work backwards”, you almost certainly have a Latch engaged: click it once and everything returns to the automatic rule.
The clickable area is the button’s center disc (the dot ring is not clickable).
9. Remote control: MIDI and keyboard
The two buttons in the trigger row assign a remote talkback trigger. Both fire exactly the same action as the ON AIR button (the inversion from section 8), and both respect the Push to Talk / Latch mode. Assignments travel with your DAW session.
MIDI
Relay listens directly to every MIDI input on your Mac — no MIDI track routing, no DAW configuration: plug in the controller and go.
| Assign | Click MIDI: --- → it shows MIDI: learning... [N srcs] → move the control you want (a CC or a note). The assignment is captured on the first message and shown on the button (MIDI: CC #64, MIDI: Note C#3) |
[N srcs] | How many MIDI inputs the Mac can see. If it reads [0 srcs], your controller isn’t reaching the system — check the connection (you can plug it in with learn open: the counter updates live) |
| With a CC | Values of 64 or more = press, below 64 = release. A momentary pedal/footswitch (127/0) behaves as native Push to Talk |
| With a note | Note On = press, Note Off = release |
| Channel | The assignment is tied to the MIDI channel it was learned on |
| Clear / cancel | Right-click the button: cancels learn if armed, otherwise clears the assignment |
If you run several instances of Relay in a session, they all listen to the system’s MIDI: one pedal would fire every instance holding that assignment. A single talkback instance per session is the norm; if you use several, assign different controls.
Keyboard
| Assign | Click KEY: --- → KEY: press keys, then release... → press the combination and release it. Modifiers (cmd, shift, alt, ctrl) and multi-key combinations are supported |
| The right gesture | Press the full combination and, on the way out, release the main key first while still holding the modifiers, until the button shows the assignment. Check it shows what you meant (e.g. KEY: cmd + shift + t) — if a modifier is missing, learn it again |
| Scope | Works while your DAW is the active application, even with the plugin window closed or hidden — which is where a talkback lives. No special macOS permissions required. If you’re in another app (browser, Finder), the key won’t fire |
| The key is reserved | While Relay is loaded, the assigned combination no longer reaches the DAW. Pick keys you use for nothing else — F13–F20 and the numeric keypad are ideal — and avoid vital DAW shortcuts (assign the spacebar and you lose Play/Stop) |
| Clear / cancel | Right-click: cancels learn or clears the assignment |
Keys for non-English characters (ñ, ç, accents) cannot be assigned; use letters, numbers, function keys or the keypad.
10. The Rescue Recorder
“Never lose a take that happened off the record button.”
The plugin’s bottom strip is a safety recorder, independent from the talkback: it captures the signal at its sidechain input to disk, so that nothing that happens between takes is lost — the rehearsal that came out perfect, the director’s note, the conversation you’ll want to quote later.
10.1 Connecting the signal (the sidechain)
Route into Relay’s sidechain the same source you record in your DAW: the booth mic, the room mic sum, your record bus.
- Pro Tools: the Key Input selector (the key menu, top left of the plugin window) → choose your source’s bus/input.
- Logic: the Side Chain selector, top right of the plugin header.
- Other DAWs (VST3): each host’s own sidechain routing.
The strip’s 16-dot meter shows what is entering the sidechain — green, amber as it approaches 0, red at the very top. If the dots aren’t moving, nothing is coming in (and the recorder would be recording silence). It’s the fastest sanity check on your routing.
The sidechain is mono; if your source is a stereo bus, the rescue capture is mono (your DAW’s own recording is still yours — this is the safety net).
10.2 AUTO: the automatic safety net
AUTO (lights up green) arms the recorder every time the transport stops, and closes the file when it rolls again:
- You stop → a new file opens and the sidechain starts recording.
- Play or Rec → the file closes, done and on disk.
- One file per stop — you find the session sliced exactly like your working day.
It is the mode built for dubbing, ADR and foley: switch AUTO on at the start of the session and forget about it — everything said while the transport is stopped gets rescued.
Two honest footnotes:
- The recorder starts a few tenths of a second after the stop is detected (and there is no pre-roll): whatever is said in the exact instant of the Stop may not make it in. Everything from that moment on does.
- REC overrides AUTO: with AUTO on, a manual REC click (to cut a recording short, or to force one during playback) is respected until the next transport change, where AUTO takes over again.
10.3 REC: the manual recorder
Without AUTO, REC is a free-running recorder: click it and it records the sidechain (it lights up red, and the whole strip tints red while recording); click again and the file closes. It works whatever the transport is doing — stopped or rolling.
While recording, the bottom line shows the file in progress (Rec: rescue_20260803_143207_000.wav); at rest it shows the destination folder (Recording to: ~/Music/Relay Talkback/Rescue).
10.4 The files
- Format: WAV, mono, 24-bit, at the session’s sample rate.
- Name:
rescue_YYYYMMDD_HHMMSS_NNN.wav— date, time and a counter. Sorted alphabetically, they are sorted chronologically. - The take counter (
N takes) shows how many rescue files are in the current folder — including files from earlier sessions still sitting there.
10.5 The destination folder
By default, everything goes to ~/Music/Relay Talkback/Rescue/. The Folder button (left- or right-click) opens the menu:
| Option | What it does |
|---|---|
| Choose folder… | Pick any folder by hand |
| Detect from Pro Tools session | Locates the open Pro Tools session and sets the folder to its Audio Files/Rescue/ — rescue recordings live right next to the session’s audio |
| Open in Finder | Opens the current folder in the Finder (creating it if needed) |
| Reset to default | Back to ~/Music/Relay Talkback/Rescue/ |
The Open folder button next to it is the direct Finder shortcut. The chosen folder travels with the DAW session: reopen the project and the rescue files keep going where you left them.
10.6 Pro Tools session detection (PTSL)
Relay talks to Pro Tools through PTSL (the Pro Tools scripting layer, available since Pro Tools 2023.6). The status chip in the strip header tells you how that conversation is going:
| Chip | Meaning |
|---|---|
PTSL: CONNECTED (green) | Connected to Pro Tools — session detection is automatic and exact |
PTSL: CONNECTING (amber) | Establishing the connection |
PTSL: NO PRO TOOLS (grey) / PTSL: ERROR (red) | No Pro Tools on the other side — normal if you use another DAW; nothing else is affected |
With PTSL connected, Relay knows the session folder immediately. In fact, if you have never picked a folder by hand, it sets it for you: as soon as it connects to your session, rescue recordings move to the project’s Audio Files/Rescue/, no clicks needed. If you choose a folder manually, your choice always wins.
Without PTSL (older Pro Tools), Detect from Pro Tools session still works through an alternative route: it scans the audio files Pro Tools has open and deduces the session — it needs the session to have at least one audio file imported. If it can’t detect one, it tells you with a notice, and Choose folder… is always there.
10.7 Talkback and recorder, each to its own
The recorder captures the sidechain exactly as it comes in, regardless of the talkback state: whether your mic is open or closed has no effect on what gets recorded. The strip’s (i) button sums all of this up right inside the plugin.
11. DAW notes
Pro Tools
- Native AAX, Pro Tools 12.8.4+. Relay is mono → mono: insert it on your talkback’s mono track or Aux.
- The Rescue Recorder’s sidechain is fed through the Key Input (the key menu).
- Automatic session-folder detection uses PTSL (Pro Tools 2023.6+); on older versions the alternative detection applies (10.6).
- After installing or updating: Cmd+Q and relaunch (Pro Tools caches its plugin list between launches).
Logic
- Via Audio Unit, on mono channels: Audio FX → Kaizen Audio → Relay Talkback.
- Sidechain through the Side Chain selector in the plugin header.
- The transport state Relay sees is Logic’s (the pill confirms it).
Nuendo / Cubase / Studio One / Live / Reaper
- Via VST3 on mono channels, with whatever sidechain routing each host offers.
- The PTSL chip will read
NO PRO TOOLSorERROR— expected outside Pro Tools and harmless; everything else works the same.
12. Troubleshooting
I insert Relay and nothing happens — no talkback, no meters. That’s the unlicensed state: complete silence plus the activation panel on screen. Activate (or start the trial) and it’s running within seconds. Section 4.
The mic doesn’t open/close when it should. Look at the transport pill: it is what Relay is seeing from the host. If the pill changes but the gate feels “backwards”, check the Gate mode (section 7) — and if you’re on Mode: Latch, make sure you didn’t leave an override armed (one click on the big button clears it, section 8).
The button says ON AIR but the room can’t hear me. Relay opens and closes its channel; the path from that channel to the cue headphones is your DAW’s routing. Check that the button’s ring moves when you speak (the mic reaches the plugin) and follow the routing from there.
The assigned key doesn’t fire.
Is the DAW the frontmost app? The shortcut works with the plugin hidden, but only while the DAW is active. Is the assignment complete? If you learned cmd + t and the button only shows KEY: t, learn it again releasing the main key first (while holding cmd) — section 9.
I assigned a key and now the DAW doesn’t receive it. That’s by design: the assigned combination is reserved for the talkback while Relay is loaded. Assign another one (F13–F20 are ideal) and the previous key returns to the DAW.
MIDI doesn’t fire.
Open learn and read [N srcs]: with [0 srcs] the Mac can’t see your controller (connection/driver). Remember the assignment is tied to the MIDI channel it was learned on, and that CC values below 64 mean “release”.
The recorder writes silent files. The sidechain isn’t receiving signal: the strip’s 16 dots must move. Check the Key Input (Pro Tools) or Side Chain (Logic) — 10.1.
I click REC and it switches itself off.
Without an active license the recorder won’t arm (section 4). If the license is fine, check that the destination folder exists and is writable (see Recording to:).
“Detect from Pro Tools session” can’t find the session.
With the chip on CONNECTED, make sure a session is actually open. Without PTSL, detection needs the session to have audio imported — or just use Choose folder… directly.
I see channel-strip parameters (HPF, Gate, EQ, Comp…) in the DAW’s automation list. They belong to an internal processing module that ships disabled. Leave them at their defaults.
“Online validation failed” on screen. The plugin can’t reach the server (offline? VPN? proxy?). You have a 14-day grace period with the deadline shown, and the audio is never cut mid-session. Get back online before that date. Section 4.6.
I want to move my license to another Mac. License → Deactivate on the old machine; activate on the new one. Section 4.5.
Support: hello@kaizen.audio — write from your account email and include plugin version, DAW and OS. Error messages in the license panel can be selected and copied directly.
13. Specifications
| Input / output | Mono → mono, with a mono sidechain input (feeds the Rescue Recorder) |
| Transport gate | Stopped / playing / recording, with two selectable rules (Open on Stop · Open on Playback) and manual override via button, MIDI or keyboard |
| Ramps | Cosine curve, 30 ms open / 20 ms close — click-free by design |
| Rescue Recorder | 24-bit mono WAV at the session sample rate, one file per transport stop in AUTO mode |
| Latency | 3 ms, reported to the DAW and compensated automatically (PDC) |
| Sample rates | 44.1 – 192 kHz |
| Automation | Talk Override, Button Mode, Gate Mode, Rescue Record and Rescue Auto-Record exposed to the host |
| CPU | Negligible — designed to sit in every session |
| Formats | AAX · VST3 · AU — macOS 12+, universal (Apple Silicon + Intel), signed and notarized |
Relay Talkback is a product of Kaizen Audio Group SL — kaizen.audio Pro Tools and AAX are trademarks of Avid Technology. Logic is a trademark of Apple Inc. All trademarks are the property of their respective owners.